Tuesday, 31 January 2017

Tiny Little Stuff

Last Friday, I attended a Beading workshop. I have done some beading but I went to make sure I was doing it correctly. Turns out instinct is good. I was fascinated by the size of the projects this woman does, and in her own words, some take years.
BUT

She had some snowflakes. Just what I wanted to finish a dew pieces.
She directed me to U-tube and there they were. The first one, I was all thumbs but now I have 6 under my belt. Whipping up a STORM.......

Each takes 48 seed beads and the finished result is a little larger than a dime.
Yummy!

A Tree...........(what else?)

I will eventually decide on a name for this one as it evolves. This is another image that's hovered on the fringes. The method of construction came to me about a week ago. (Our Fibre Arts group is meeting tomorrow and we are supposed to be doing some 3D felting......we'll see.........)

To give this piece life I decided to embellish it with felting. (I've only owned the machine for a year..!)
I played this morning.

Then I went off to the store for more suitable yarn. And as a bonus I came back with the background fabric. It's actually interfacing for tailoring, but I loved the subtle markings and colour.


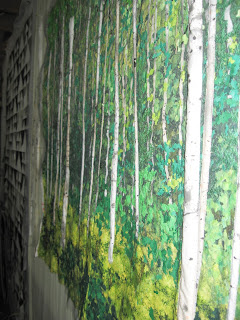
Here's this original picture, a water colour or even a print. Love it!

Starting with the tree trunk I twisted about 5 different yarns and a few pieces of skinny cloth together and felted it to the background.


I was going to continue felting the branches but I was losing the kinks and twists as the felting tightened the yarn. Plan B...layer it on, cover it with the "leaf" material and catch it when it was sewn down.


The material I'm using will lose all it's detail with the embellishment, but it always makes me laugh. I call it my "broccoli " material. Of you look closely it's really bunches of Tulips.

I stopped here.


The green material is "glued-sticked" on and the whole is covered with netting. After stitching ALL the netting will be cut away.


Monday, 30 January 2017

Sunrise - Final


I will never know why finishing something ALWAYS takes longer than you anticipate.

That is one of the Axioms of fibre art.
The second is when you want it straight, it is never straight.
Almost, this time, but not perfect.
Sigh!
15"x24"
Enjoy

Sunday, 29 January 2017

Sunrise - Day 4

I thought I might finish this today, but alas, no.
We had a cookie crisis and I was compelled to bake first thing this morning. (Oh the pain!)
I'm a granola gal but hubby likes his homemade raisin oatmeal cookies. What's a girl to do. So now he's got at least 4 dozen. That should get him to Valentines Day.

As for the trees....there were so many fine edges on this cutout I decided to go with Satin stitch for security, all around and also to define the branches. I was very pleased with my new machine. It gave me a  nice tight 1mm satin stitch with no issues. (Hurrah)

I also decided to make the bottom half solid black. I cut away the organza and the navy fabric underneath and slipped in the same black material as the trees. Some fussy stitching and the trees will appear as sentinels on the rocky mountain.

I finished one.
Tomorrow.

Saturday, 28 January 2017

Long but Productive Day

I woke up this morning with all kinds of solutions. Unfortunately? it was only 5:00 AM.
I got up anyway, turned on the coffee and went over a number things in my mind. A lot of it was for another project but I did start in nice and early.

I got myself into a little trouble right off the bat. I'm always torn between leaving raw edged, fused applique plain and unadorned. Trying to thread paint it can lead down a dark and dangerous path. It did today.


I started off fine matching colours to the first section of hills, but I soon became aware that I was woefully short of purples. This was rapidly turning into a "dog's breakfast". Against my original decision, I went back to organza and after trying a few different colours I choose a dirty gold. It tamed the colours and gave the "hills" a misty feel. Perfect after all!


I had originally thought to create a tree from yarn but instead went with some silhouettes. I chose to add two groups for a total of 5 trees. These were enlarged from their original photo to fill the scene. Then it took close to 3 hours to cut them out from fusible web backed black fabric.


Here they are auditioning.

On a whim I cut as small piece of orange organza and nestled it onto the horizon. It may stay.
So now at 2:30 PM, I think I'll stop for the day.

Thursday, 26 January 2017

Trying NOT To Burn My Bridges

What to do with the pink Sunrise.
In the past I've using these strictly as backgrounds for a silhouette. Nice but that's getting boring. And I'm not happy with the white border for everything.


I thought I'd try using it as part of an landscape.


All the "land" pieces were fused together on a separate piece of interfacing. I didn't want to join it all just yet.


Pinned together, they don't look bad.


Now the question here is how, or whether I need to give the same degree of importance to the land with complimentary tight stitching.
As for the silhouette, I would choose a live tree as opposed to the illustrated dead one.

Wednesday, 25 January 2017

What Do You Do The Day After.........

Clean up after the fat lady..... and find some unfinished things to play with.
I do have a "flying Geese" quilt to finish but I haven't decided on how and am certainly not in the mood.
I'm not ready to start anything...I'm brain dead. 😛

So I found number 3 of my four "sky" backgrounds. I was two hours into this so I gave it another 4 today.
I put on a U tube compilation of "2 Steps from Hell" ( wonderful stuff....video games themes for the uninitiated) and stitched away.

https://www.youtube.com/watch?v=APmBMN7p2R4


Yes this process takes hours and hours, but it's a perfect task for those times when your head really isn't there.

Monday, 23 January 2017

Summer Birch - Final


A lot of diddly finishes on this one.
I still need to attach a hanging sleeve etc. but for all practical purposes this is finished.
40x33

Sunday, 22 January 2017

Summer - Day 12

As I'm undecided what and where I want to place accent leaves I went ahead and bound this piece. To make a simple self binding, a "border" piece is attached and completely folded to the rear and anchored. This gives a clean edge with colour right to the margin.
I will add as a caution, you do need a sewing machine with some punch and you can/will break some needles at first.


Additional stitching can go right through the wrapped material with no harm.

I auditioned a group of fabrics for my "star" leaves and found my stash lacking. This morning a painted a few samples using green Seta colour transparent paint.


Top to bottom.. a piece of the white bark material, a piece of light green batik I had used for leaves and bottom, a lighter coloured solid green.
These are all showing the intensity of colour I'm looking for.

Then what does hubby say..... "Why not throw in some flowers"...............
Auurgh!
Now I'll monkey mind that for days!

Saturday, 21 January 2017

Summer - Day 11

I spent most of the morning correcting a machine error.
I attached the major trees using a blind hem stitch. My new machine gave me a much tighter stitching pattern The result was the trees looked pinched along the outer edges. I ignored it for a while. I was trying to avoid dressing these edges. I had done it in the past and though effective it was a very time and labour intensive task.

After deciding I had no alternative, I used that as an opportune time to mount the whole piece to the batting and backing. While the resulting mass of material was very heavy and awkward, it accomplished the two goals.

The piece is evenly anchored to the backing and the edges of the trees no longer have that artificial look.
Compare yesterday to today.


Friday, 20 January 2017

Summer - Day 10

This was not really a full day. I spent the morning receiving some new furniture. That meant cleaning and rearranging other furniture and art. That takes a lot of energy. There is so much emotion involved. LOL ( Hubby and I don't always agree on position and order etc, let alone art!)

To salvage the day I did 3 things.
I measured and readied batting and canvas backing. It's time.
I have read that a number of artist forgo batting. If its not being entered into a quilt show it's not necessary. I chose to add it because of the size of the piece. The edges need stabilzing and it needs a little heft to hold it steady.

The second thing I did was to add some branches with embroidery thread. These will have leaves dedicated to them. I thread the full 6 strands through the boles of a few trees as they would erupt from the bark.


The third task was to turn the trees from cloth to bark. I felt it was necessary to add more intense black, more so than the initial painting has created. On a birch tree the black markings on most of the trees are associated with branch growth and loss or damage. In some areas I used paint to darken the grey but in a number of spots I used a simple black marker. When you want black.........

I included a picture of the before (yesterday) and after (today) to show how much it changes the flavour of the scene.


Thursday, 19 January 2017

Summer - Day 9

When you start these pieces, you really have no idea how it will go. Part of the work is always exciting and part of it is just plain work, a test of perseverance. 4 hours of steady sewing and I made it out the other side..

I added small pieces of brown and grey-green cheesecloth as a base and then layered it with 5 different fabrics. In this case I used white netting to maintain the bright colours and then cut away absolutely anything that I could.

Now I can add the finishing touches.


Wednesday, 18 January 2017

Summer - Day 8

I got the day correct this time!!

Finding time to work on this piece while juggling the rest of your life isn't always conducive to a lot of progress.
I was out at 8 AM to have my hair trimmed. It's a 2 hour round trip and I drive 50 miles to a woman I love.. Women do these things.
When I returned I found an email link to a Show and Sale in TO this summer. My step daughter is putting a lot of pressure on me to participate in this. She has just finished revamping my business cards and creating a Post Card? as well.
Working my way through the application took around an hour. I was asked for samples of my work. How do you choose?

By the time I finished I needed coffee. Two cups and a sandwich later ( stress makes me eat ......well almost everything makes me eat!) I finally headed down to my space.

There is a lot yet to be done and because my head wasn't clear, I immediately got lost in detail. That's dangerous?...and can lead to unnecessary work, work that will be covered or even wrong.
What did I do?
Well I had had an idea last night in bed so I threaded some "branch" twine on a big needle and slipped a  yard of the material under the tree fabric. This is definitely more secure than butting it up to the edge.
In a few places I clipped a few stitches ( the point of using blind hem stitch ) and inserted narrow pieces of a fabric under the larger trunks, as small branches.

Then I made 3 tree/shrubs. And stopped.
The foreground is my next hurdle, but as I was coming up for more coffee I mentally solved the colour issue. Tomorrow I get out my dyed cheese cloth to tame that yellow foreground.

Here are the three trees. Can you find them in the whole piece?


Tuesday, 17 January 2017

Summer - Day 7

Not much time today.
This afternoon I found a few minutes to play around. In the mid ground I put it two young trees using twine. There will be more. 


It only takes a slight shift in the colour to add a lot of depth and texture with a few pieces.

Monday, 16 January 2017

Summer - Day 6

It took a longer to finish the trees than I expected. I had prepared a lot more but in this case I decided "less was more" and added only three. Even then it took a long time deciding WHERE they would go. 

I stitched down both side of these latest 3 and went back to the 9 from the other day and worked them as well. To give each a little more importance. I "stuffed" them. The smaller ones had 3 or 4 strands of yarn put under the material. The 3 large ones had a strip of batting plus yarn to fill them out. I tried a photo from the side to see if this effect would show up. 


Nothing left but.......SHRUBBERY

Sunday, 15 January 2017

Summer - Day 5

4 hours,
9 more trees.
and more leaves.....
From here on all the materials are stitched down, rather than netted.
The brightness of their colour says foreground.

The hold up?
I haven't quite decided how to finish the lower foreground.......


Saturday, 14 January 2017

Summer - Day 4

The background for this one is complete.
I added 4 more bigger evergreens, in colours a little brighter. They will easily be seen. The darker ones will reveal them selves when you look at the bolder ones. Though in my photos they are almost invisible.


"Hundreds" more leaves and more birch trunks.
Hummmmmmm maybe I was wrong about my not having lots and lots of trees.


I'm not quite ready to sew the two sides together yet.


Friday, 13 January 2017

Summer - Day 3

I started the day doing what I should have done from the start. I cut this piece in two. I thought about but didn't act until it was time to stitch. The smaller piece makes everything more secure and easier to handle.

I inserted a small triangular piece at the left to taper the dark area under the netting. Then I stitched. That took about 3 hours.
Beginning again, I added 20 slivers of cloth for the birch boles .
More "leaves" and more (trees) threads and cord. It's important to work right to the edges, even if you end up cutting it down.

To finish the day, another layer under tulle.


Wednesday, 11 January 2017

Summer - Day 2

( Yes.. I renamed the file..summer seemed more apropos.!)
A good morning's start.


All of the multi batik was scattered, in bunches. First ,it was placed to soften the edge between the light and dark materials and then I placed to to imply density in both the top and some in the bottom.
These pictures are all taken with the cloth laying on my worktable, not ideal but other than a light tack spray, nothing is attached.


The batik tones down or covers the yellow and orange in the background fabric nicely.
I also added slim trunks, full 6 strands of embroidery floss ( 3 colours ) and then some cut pieces of black thread for branches.


Another light misting of tack and about half of the lighter colours were placed slectively, to "complete" a "tree".


This is still all background and it goes together very quickly.

In the afternoon I tackled a few evergreens. I have no idea how many I'm going to insert. The longer I look at the photo I think the dark area is a result of a rock face rather than the evergreens. ????


Standard method here, tulle or netting in a hoop. I like to use a darker colour in the bobbin to add a little interest and break up the mono colour. I did 5 altogether. That's enough for today.


These just "stuck on" and almost disappear, but they do peak through.
As a final act at the end of the day, I rolled a layer of tulle over the whole piece and pinned it well so I could hang, photograph and "see" it properly for the first time.