Friday 30 November 2018

Chekamus River Canyon - Day 5

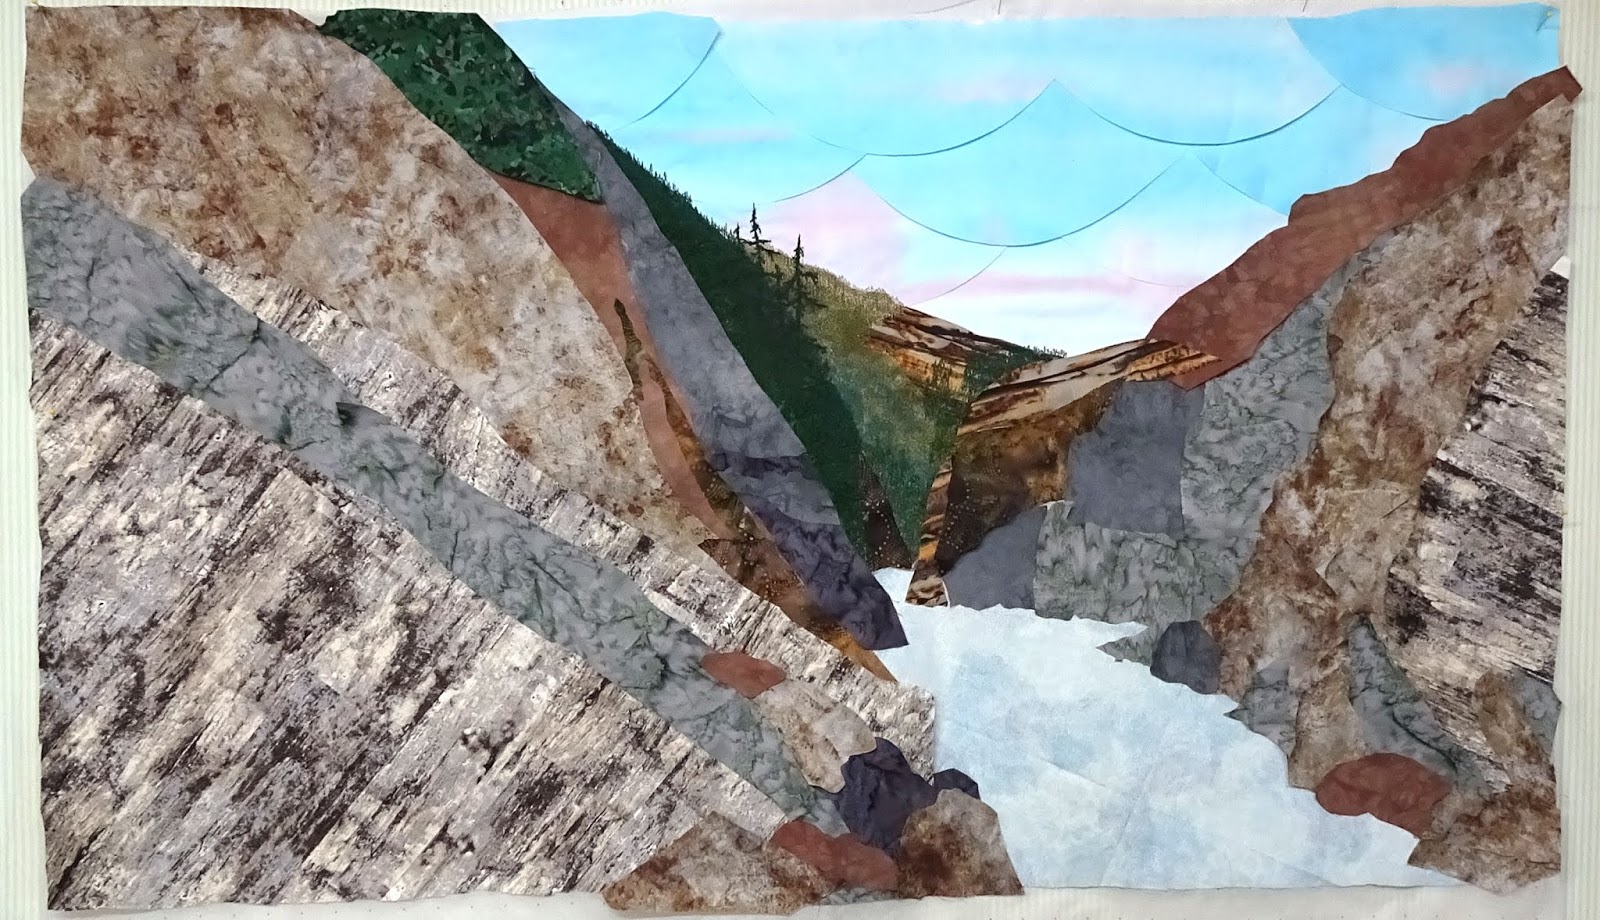
I spent an hour 'sketching' small trees onto netting. These were to be positioned down the distant slope on the right side of the canyon. However, when I went to place them in position I realized I had to deal with the sky...finally. It would have been very difficult to stitch around the tiny trees.

Necessity forced a decision and I went with close, straight lines. This took the rest of the morning.


I placed registration marks with a water erasable pen on the sky to help keep the stitching even and straight and sewed lines about 1/4 in apart. I used the pressure foot to give me the width between the lines.
A spritz with water and the lines disappeared.


As the ends of the lines stopped at the edge of previous stitching I worked the tails through to the back side, combed them in one direction and glued them in place with a strip of stabilizer. This strip will be incorporated with the final stitching.


After a late lunch, I was finally in a position to attach all those trees I had assembled in the morning.


Tomorrow is another day. 😁

Thursday 29 November 2018

Chekamus River Canyon - Day 4

Moved forward by two hill slopes this morning.


The whole picture puts it all in perspective.


I think I"ll shift to the other side for awhile.

Wednesday 28 November 2018

Chekamus River Canyon - Day 3

For those keeping track, this is 5 hours of machine work.

The very distant slopes are covered with trees. That was simple but lengthy machine work.

The back illustration shows the volume of stitches in this area

.
The green swath down the left side, forest, I worked off the piece in a hoop.


As the size of the thread painting area gets larger the more distortion can occur. Though it may not be
readily visible in the pictures there are many different shades of green being used here. 


The final part for today was comprised of trees in the left hand section that rise above the slope edge and sit in front of the distant hill. It's these 'eruptions' that give life to the work.


My twitch muscles have given out for the day. I'll pick this up again tomorrow.


Tuesday 27 November 2018

Chekamus River Canyon - Day 2

The colour blocking is complete and the workspace tidied.

Right side complete
Left side complete

Now I can work the detail into this.
That will take a little more than 2 days.

😵


😏

Monday 26 November 2018

Chekamus River Canyon - Day 1

Design and Colour blocking.


After I enlarged the photo to fit my interfacing ( 33x45 ) I started with the sky.
I had a FQ of my own painted fabric that I wanted to use. It embodies the wonderful sunsets in the mountain.


But it was too small, or rather the wrong shape. After some internet research I decided to cut it up.


The sky is Glue tacked. Fast but secure enough for now.

The River, glued, will be covered with stitched gauze, but blue water may poke through..

Then I moved to the very distant features, the rocky out crops and the misty? forest.
These and all the rest will be fused. Some of the pieces will be small. Fusing is the most secure.

Enough for today!

Sunday 25 November 2018

Starting a New Piece - Chekamus River Canyon

When I start a new piece, I need to get everything sorted in my mind.
It takes a while to get everything in sinc.
This is what I've decided to attempt.


This photo was taken in BC last summer by my son, the climber. He spent 4 months in Squamish ..................  climbing.
This is the whole photo captured with his phone. I'll probably work to the whole piece and then crop at the end.

There's a lot going on here and it's taken me about a week to settle on this particular photo. Most of the time is taken thinking about method and fabrics and detail.
And size.
This seems to call for larger, perhaps larger than I've attempted before
It could be done as a split piece.
Now I've committed to this one ........ I definitely sleep better.

Tuesday 20 November 2018

Naomi's Boat - Final......well my section anyway.


After it's all assembled, 7 more sections, I may add more coarse grass. Hopefully this will be ready to quilt before the New Year.


Monday 19 November 2018

Naomi's Boat - Day 6

This almost done. What is left are the major coarse grasses.

I tucked in an extra 'maple leaf'. 😁


The brilliant green grass is actual some  'poly' paper that's used for flower pots and packing.
Easy to work with.
I may add more.
These photos are trimmed down to actual size, the strip I'm responsible for. 3' x 6".

Sunday 18 November 2018

Naomi's Boat

I worked about 6 -8 inches more in two steps. Each was, as before, in a fold of washable stabilizer on netting.


I also added some black and brown paint to the hull of the boat to bring it closer to a weathered abandoned craft.


Almost time to work the large grasses.

Thursday 15 November 2018

Naomi's boat - Day 4

We had a quick meeting yesterday just to see how were we're all progressing.
We exchanged a lot of ideas, borrowed some fabrics from each other and went home all ready to work.

I had progressed down to the start of the grassy area and stopped there. I hadn't decided how to handle it. There are only three of us that have a lot of grass so I exchanged a few ideas with them.

I knew I wanted to use thread but I didn't want to put down more netting. Instead I sandwiched some cut threads in a washable stabilizer sandwich.


That I placed under some hooped netting and stitched just enough for ease of handling and to anchor the threads.


After rinsing and drying it (with an iron..I'm an impatient sort) I placed it, netting side down. I glue tacked more branches and leaves over top. There was enough glue involved ( ironed hot to spread and set) to anchor the whole thing in place.


This needs about three times as much but I like the look and the ease of the method. It's really easy to tweak the colours of the grasses.

Tuesday 13 November 2018

Naomi's Boat - Day 3

This morning I worked on the rose hips? We had all agreed that the shrub looked like a rugosa of sorts.

I started with free motion stitching a scattering 'rose hips' in a loose pattern over hooped netting. I used a very bright rayon so they wouldn't disappear.
Over this I stitched branches visually following the layout in the picture.
Next it was positioned and anchored to the base with more branches in a darker colour.
All the excess netting was cut away.


Over this more branches and three shades of leaves we glue tacked. These were placed to cover the linking threads of the 'hips'. It may have more applied but It depends on the next section and how much it moves into this area.


Monday 12 November 2018

CQA Group Project - Naomi's Boat

I am privileged to know and stitch with a group of very talented ladies from our guild.
Most are very quiet about their work but in the approximate 10 yrs we come together they all have brought fresh eyes to the various projects we've tackled.
Last September I twisted a few arms and minds and most of us agreed to try a composite piece for the CQA Quilt Exhibition in Ottawa, next June.

Right from the start those of us familiar with 'calls for entry' made it clearly understood there was a definite and ever looming deadline for this. In our case, (while the applications are now open,) we're targeting the closing date of January 31.

This is what the group chose.


The picture was taken by Naomi's husband. He's really tickled pink we chose his photo.

Those more experienced in deadlines and competitions deliberately pushed for quick decisions so the project didn't get over thought or hurdles raised to our completion of this.

It was enlarged and divided into 8 slices and distributed with only one common fabric.

I know most have been working on this, and when I finally got a break in 'Life', I too dove in.
I drew the second slice. It has a touch of the stern of the boat but is primarily vegetation.


As is my way, I colour blocked the background and under colours.

 Starting from the top I began working the branches in the background.


Today I worked down to where I now need to 'manufacture' some rose hips on a wild rugosa.
Everything is simple glue-tacked.
That was a good place to stop today.


Sunday 11 November 2018

Al Cote Workshop Piece - Second Time Around

Back in April I attended a workshop to make a 'rug' using a multi fabric stitch and cut technique. Al Cote hails from the Niagara region and has shown and taught for quite awhile.

You may recall, I was really unhappy with the results. It was just................,  blah  😝


This topic had been on my Fibre Arts group agenda for our 'day at the quilt store' bi-yearly event where we shared and taught each other, or finished major projects. We had to cancel because of other commitments but everyone still wanted to try this. At our last evening get together we worked on these pieces.

I can say I'm much happier with my second attempt, delighted even. So after stitching and clipping each 'window', facing and hemming the edges, then washing and drying (with baited breath) its done.


I like it.
I'll use it.

I can't see right now how to incorporate this in the things I usually do.......but.
I'll have to think.
(I may finish the first now.)

Wednesday 7 November 2018

King size Customer Quilt

While this was a lovely quilt to work on, the motifs my friend wanted were larger than the throat of my machine. Now I don't know about other LAs but I really, REALLY hate marking a quilt. I double tested the water erasable pens in many spots and then dove in.

As she wanted a large leafy wreath in the obvious centers of the blocks I drew the guide lines for the vein of the wreath (22 in dia) and how far into the center the leaves would go. Inside that a standard medallion; this one a flower with leaves.

my EQ version to doodle on


center medallion

The rest was vine fill.


Glad to say all the marks came off and my friend took her quilt home to bind. She'll have a very happy daughter this Christmas, I think.

Saturday 3 November 2018

Scandinavian Gnomes / Trolls

I've fallen in love with these little guys. They've been around for quite a while, but this year they seem to be popping up everywhere. Thinking they'd make a nice change of pace in my Christmas decorating (minimalist) I dug through the unmarked boxes for 'stuff'. I could only find one piece of fake fur. I know I have more but for a run through of methods, what I had worked fine.


This first fellow (who ended up on my naked Christmas wreath) utilized a sweater sleeve for the body (hidden here with his beard) and a sewn triangle for a hat. The body (sweater) was molded from the lower half of a sleeve, stitched and drawn up tight at both ends (after filling the cavity with rice). The nose was a 2 inch circle from an old T shirt, drawn up like a yoyo and stuffed with craft poly. A strong wire was run down through the body to support and shape the hat. All pieces are hot glued in place. I attached him to the wreath by running a length of tulle through the wires of the wreath frame and tying it off to form a pocket. He sits in the pocket and it's concealed by his beard.


The next big fellow (10 inches) was constructed with the same basic method but I used a piece of regular material. The bottom end is sealed with a circle stitch to the cylinder of material and filled with rice. Nose was the same but the hat I cut shaped from a fake suede. Again everything is hot glued.

The last little fellow is made entirely from one child's sock. He's filled entirely with craft poly and his nose is a white shank button. His hat is the cuff of the sock with a yarn tassel. While he too is hot glued the beard and hat could have been stitched to the body making is a little more stable for little hands.

I need to hunt down the rest of my fake fur. Hmmmmmmmmmmm I also have a mink stole around somewhere the I took apart this summer.
They were fun.
There are tons of variations and pattern out there. Some use cones, some styrofoam balled and some like these just some creative cutting a hand stitching.
Perfect for and evening with my Fibre Arts group.