Friday 31 October 2014

Halloween and Stellar Jays

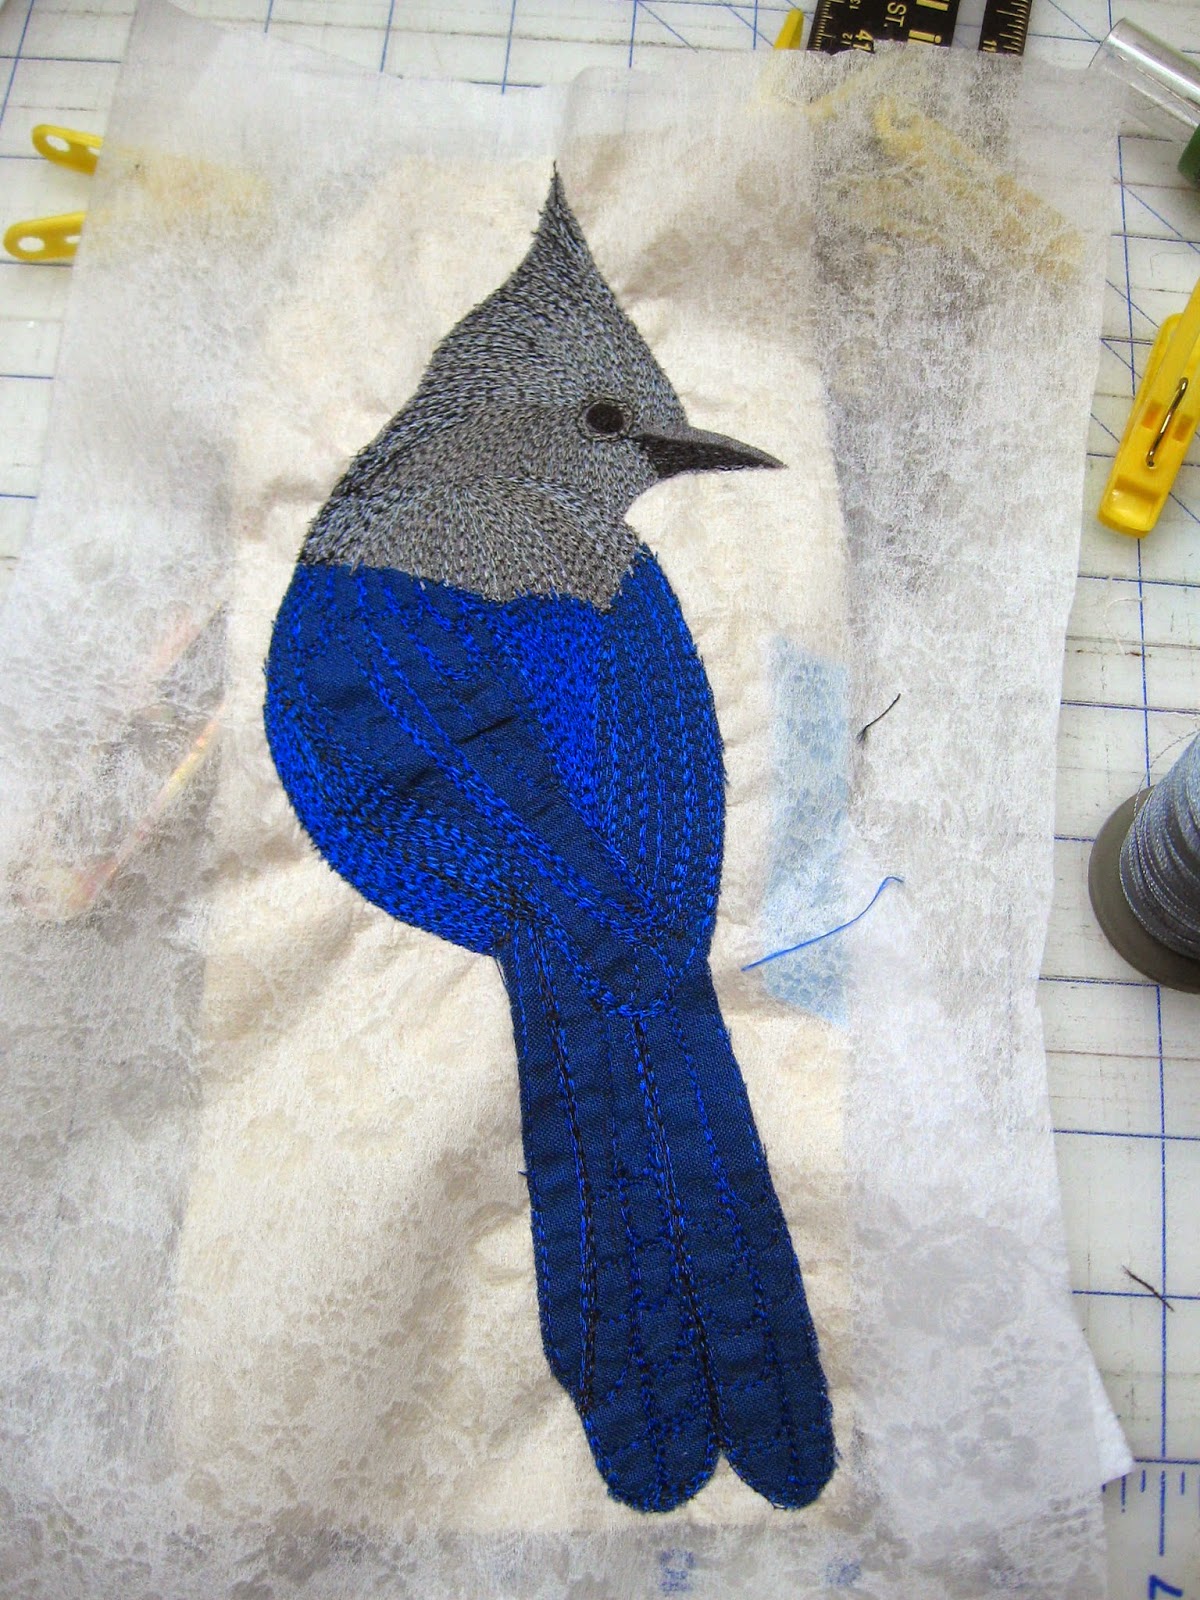
Though I worked all week I was able to devote around an hour every evening to move this Jay to completion.
(Lost a few hours this morning to the needs of the holiday.)

 
(It's a CAT. Hope it looks better in the dark.)

The Stellar Jay took a few days.
As its been a year since I did the originals, my feel for the colour and feather structure had to come from the first piece. When someone asks you for some thing "like the one we bought" you're never sure whether they really mean just that. But I did my best.


Behind the cartoon I slipped an narrow piece of canvas to stabilize all the stitching. Some areas are going to receive multiple passes.
I used one of the blues to mark out the feathers and then did the head. The grey was pretty obvious. There are 3 shades of grey here.


A few passes with black, shaded the head and defined the lower beak.


 More Blues and some blue feathers in the top knot.


Altogether there were 6 different blues used. Then I cut it away from the backing and the canvas.


And stitched to the prepared background. All the edges were then "feathered" with appropriate colour to hide the edges of the canvas and to thoroughly anchor the bird to the branch.


A little binding and this piece will be away to the Netherlands tomorrow.

Sunday 26 October 2014

Jelly Bean Houses - Great Day for Construction.

Actually I've been working on these pieces for about 3 days now. The shadow effect I wanted, to give that 3 dimensional look, worked very well.
I only burned myself a few times fusing the little bits.
The address has no meaning for me. I'm considering beading over the numbers so I wanted some fluid shapes with no sharp corners as the numbers are only about a centimetre tall.

The roof, porch and steps are the only things left. I'm trying to decide whether to do cement ie grey, or wood. As my trim is beige I'm sure the stairs should?  match and if not, what other colour would I like to introduce.
Ed wanted a green door but this blue is one of my favourites so I went with it. ( And it drags the red back from orange)

diddily
diddily
work.
I wasted a lot of pieces miscalculating overlap and wrap around distances.


Saturday 25 October 2014

October 25.........The Time Has Come..........

Two months till Christmas so its time to bake
Christmas Fruit Cake.
I started the "fruit" yesterday. I don't really measure the fruit components because Ed usually picks it up and he brings home whatever he thinks is good this year. And its an opportunity to clean out the cupboard of the bits of raisins and currents left over from other things. I guess the closest I come to measuring, is getting the weight (in this case 5+ pounds). From their I adjust the recipe.

What recipe, you ask. This year I went with a dark fruit cake recipe from Cooks.com.
My mother used to make fruit cake ( and I hated it as a kid unless she made it with fruit gums) and I don't have her recipe, a family recipe. I suspect hers came from her cooking bible, an old Fanny Farmer.  Its like Rum Balls. I search every year and make a different one each year. They just don't seem like what I remember.


So all this candied fruit was mixed up with some whiskey (that's what we had in the house this year. I prefer rum so I will alter it as the year goes along. A YEAR you asked. Just wait.)

I stirred in a cup of flour last night but it looks like the additional moisture will require another cup of flour. Gotta remember so I deduct it from the recipe amounts. (2 cups of flour gone)

This is one of the very few times I get out my baby. My standard Kitchen Aid mixer. When I had a KITCHEN I had a separate areas for baking. and it sat out all the time, easy to grab and use. But now that I live in an excuse for a kitchen it sits on a shelf in the basement until it's really needed. For fruit cake, its really needed.


(I miss baking but I no longer have two bottomless pit boys living at home. sigh!)

Spices galore mixed in with the reduced flour amount. This is another time when I clean out my cupboard. They do go stale so some of them I had to grind from the whole. They stay fresher that way. It's probably about the only time I DO grind my own, but I have little use for mace or all spice through the year. Cinnamon we buy by the baggie.


I greased and lined 3 spring form cake pans. I never quite know how much batter I will end up with so I like to be prepared. In this case I only needed the two large ones.

And three hours later, (actually 5 start to finish) I have TWO LUSIOUS cakes.

 
So they will sit an cool now ( Hmmmmmm I might actually get time to sew today). I will repack them into the large metal cookie tins. IF I had some rum or whiskey, what ever, I would poke them all over and pour on about an ounce of liquor before sealing them.
I'll do that at least 3 more times throughout the summer ( yes you read right...these are not for eating right now) and when it comes time to haul them out to eat ( about this time next year) they will get another dose of booze!

Can't drive after my cake buddy! LOL
This chore always hangs over my head around this time of year but finally when the moon and stars align.... I just do it!

Yummy eye candy.

Friday 24 October 2014

Jelly Bean - 3D Architectural detail

Since I decided to work to this goal, I had to make a trip to my fabric store to by the some of the stiff poly material used to give body to purses. Tad pricey @ $16 /yd. but it will do the trick.
UNFORTUNATELY I spent a lot more than I expected because I found my upholstery GIMP, that I had used to make the tree in my Winter Solstice piece. Hurrah. (Watch for more trees in the future.)

After doing penance for spending ( I bought other stuff too,) by working my front flower bed and making a trip to the landfill with the garden waste, I finally got down to the studio.
( I also started my fruit cake for 2015)

Using the pencil drawings I was able to transfer the shapes and dimensions to the poly sheet by simply inserting a pin at the corners in the picture. It left a mark clear enough so I could draw the lines with my disappearing pen. A "exacto" knife worked best to cut out the pieces. This material is about 1mm thick. When each is coated with material and stacked it should give a nice 3D touch.

The window has 3 layers while the door and front porch actually have 5. There are more but I'll treat the steps as a separate entity.


I used the heavy "heat and bond" to attach the material and fold it around the pieces of poly. The last or outer piece folded over the outside edge to hide and bind all the pieces together. Rather finicky work. I resorted to using a fabric cement to turn under the top and bottom edge points.


Rather than cut the red background siding, a piece of "sky" and "glass" material will give a realistic touch.

Thursday 23 October 2014

Commisions

Just to make my life interesting, in the midst of working part time and assembling two pieces, I received an email from the Netherlands from a lovely woman who had purchased one of my Stellar Jays last May while she was in Golden B.C.
She graciously asked if I had another, and if not would I please make her a second.

This piece was actually made over a year ago at my yearly retreat in Algonquin Park with my other quilting ladies.
This is one of the reasons I carefully photograph and document most of my work. I have the original picture I worked from and pictures of the final piece.
So this is one she purchased. Thread painted and perched on a pine bough. And she would like it to be "just the same"
Aha! there's the rub. I can never make it the "same".

 
I made the cartoon today and will start this in a few days. I think I have all the thread.
BUT.....
I need to be further along with the Jelly Bean and the Tofino piece. I simply can't switch gears that much.

October 23 - Bonus sewing

Well I worked on the two pieces today, both the Jelly Bean House and the Tofino walk.
I redrew the doors and windows and cut and pasted them on the siding. Still not quite right but close. I was thinking about using some stiff stabilizer to build up the sashing and make the piece 3 dimensional. Its pretty thin, so maybe I'll boost it with batting as well.

 
The Tofino piece needed a lot more work on the tree base. My DH took one look at it this morning and snickered........(he'll pay.)
 
I started by tucking in bits of dyed cheesecloth and anchoring it with thread. I switched from a dark invisible thread because it was too shiny. My wash away stabilizer had arrived in the mail yesterday so I used pieces of it to stitch over all the folds and the yarn to anchor the cheesecloth and to create tucks and folds in the material.
 
I trimmed it slightly and placed it on the chosen dark green background, still auditioning whether I would emphasis this as a vertical or horizontal piece. Horizontal would give me more space for ferns and leaves. Vertical emphasises the trunk more than anything else.
 
I assembled several paper patterns for the board walk. This has a retreating perspective that also makes an abrupt turn. After playing with it for about an hour I was able to cut and assemble grey boards. These are stitched together with a fold to help differentiate the planks and add some dimension.


Tuesday 21 October 2014

Jelly Bean Houses......Seriously!

So I'm bouncing back to my Jelly Bean House project while I'm waiting for the wash away Stabilizer to arrive.
While I was working on the Red Rock, I would take breaks from it by stitching some red fabric and red chiffon together in a folded pattern to resemble siding. It took quite a while.
Today I cut it in half and made it very long and thin to accommodate a door and upper story window only. About 18 inches x 9 inches
Trying to find a "head on" picture of an actual interesting door in St John's is nearly impossible. People take wide angle shots to get a long view of as many houses as possible. So I combed through the pictures and decided to manufacture one from a number that I liked.

As I'm using a red siding background I'm pretty limited to a white door and trim.......if I stay true to the actual pictures. I don't know if there are any regulation to mandate what combinations you're expected? to paint your house, but they are almost all really nice. There are a lot of white.

So far this is just a pencil draft but it gives me a size and placement to play with. Sorry the detail is just not there. (I need to change the batteries in my camera.)
Thinking of some dimensional work here.


Monday 20 October 2014

Tofino Trail 2

I spent another couple of hours on this piece this morning and I think its going to do what I want.
If you have an imagination like mine you can see that when the piece is folded in on itself it begins to take on the appearance of gnarly tree roots.
But I can go no father with this for probably a week.
I had to mail order some wash away stabilizer from Barrie ON. Any of my local supplies only sell pieces or very small amounts and I won't pay that markup. I've orders 3 rolls of ten feet. That should last me for a couple of years.
I need it because I now want to stitch over this piece and give it even more furrows and crevasses in yarn and thread. I MAY add some chiffon as well. This all needs to be done before I fold it and stitch it into place.
So here's the full piece and then folded into root like position. (The yellow pins are a bit distracting, but I'm sure you can see past that. LOL


Sunday 19 October 2014

Tofino Trail

This one has a deadline. Early December. My concern with this, as with my Jelly Bean project is I have a few things in mind, so if I change my mind I need extra time.
But I dove in today.
So here is Wendy's original photo and my portion selection photo shopped.


I painted a fat quarter in grey and dirty green to use as a background.
I'd spent some time thinking about how I could add dimension to this piece. After experimenting with folding a piece of paper, I stitched a pattern of crease and fold "lines" on my background. I then "Felted" a line of wool yarn down each line to give me a physical reference. Then I got out my wool rovings and went to work.
 
This one is going to look like nothing for a long time.


It's been a while since I did any felting and I have already made a trip out to replace the needles.
I think I have the hang of it again.
The black wool lines are the inside edge of a fold and the lighter grey yarn are the upward or outer edge. This hopefully will give me the look of the buttress effect of the tree base in my photo.
I'm using shades of grey, brown and black. There is some moss to be added so I've place some green as well. I'm undecided as yet whether I will felt the moss or go back and use my netting technique to build up a different texture. And will that be before I fold and anchor the piece or will I hand stitch it in place.
This is currently the full fat quarter. As its only a portion of my photo, I'm going to have to check with a group member to recall the max/min size we decided on.

Thursday 16 October 2014

Red Rock Canyon - Final - I think!

Well there it is! (and the original photo) So how long did this take me?    A month.
I finished the rocks at the bottom, the foliage was beefed up in a few places. A little more orange added in spots and the sky stitched down.
I'll spend a while deciding now, how to finish this. Its a present for Christmas so I do have a little time.


My piece as a portion, the upper left quarter.


Wednesday 15 October 2014

Red Rock Canyon - Vegetation - Day 2

Layers take time but they are well worth it. The annoying part has got to be changing thread colours all the time. I've tried doing multiples in each colour but I've since decided doing each individually give a more natural feel, as they are all the same.. but different.

The first two pics are one from yesterday and the finished second and third layers. Quite a difference. (Lets discount the red shift in the rocks. That's my still amateur photo shop skills)


The remainders are completed "shrubbery". Adding this green has had a softening affect on the bold orange. There are many combinations here. In some cases simply changing the tension was enough to shift the emphasis from the top thread to the bobbin thread. There are lots of differences even within the same shrub.


This last one may get more, but I'm liking the thin foliage at the top which in my eye has changed solid vegetation (olive) into shrub in front of a tan rock.


Gotta go to work now and pay for this habit! Tomorrow?

Tuesday 14 October 2014

Red Rock Canyon - Vegetation

I spent a few days carefully satin stitching a tiny line around a number of the rock to better define them and give them a sharper edge.  The sky is still a question mark but I started in on the vegetation today.

After some rough branch work in a pale green and grey, I started with the netted foliage. so far, in all I've used about 5 colours. The greens are muted in the bright light and I suspect they may be a bit dusty. It will probably take another full day to layer as much as I want. Each application of netted foliage is a different colour or combination. The result is very complex colour.


Background branches in pale green and grey and one layer of netted foliage

 
This portion of the brush has two different layers of netted foliage applied with yet another colour of green.
 
The brush in the distance has one layer of brush and the foreground has, to this point,three layers.

Friday 10 October 2014

Red Rock Canyon - Oct 10

I've been busy.
All the time this piece has been at the back of my consciousness, interfering with my sleep and creeping into my thought while at other work. I hate it when the piece takes over. I'm not sure why this has happened with this one.
I know I've placed a lot of importance on it as it is a gift for my son, but its also because its a colour I'm not comfortable with and its given more trouble than I expected.

I decided a few days ago I should have used more bright orange in the initial cartoon. I had thought the colours faded in the foreground but as I examined a lot of my son's photos again, I realized they were orange through and through. My thread wasn't giving me that, so today I painted over a portion of the piece. Its done what I wanted and brightened up the orange colour.

Its STILL far from finished but I'm happier with it now. A little more rock work and then I will start on the vegetation. And then there's the sky................

Painting with my Landscape Group

Thursday night I hosted our landscape group and, as we had discussed my fabric painting at our last get together, the group was interested in exploring this medium.
A small number in attendance made it very doable as we were working inside and could only rely on the cloths drying in situ over night. I armed everyone with a fat-quarter and after giving them a brief demo on some of the techniques and how the paint behaved and misbehaved on wet and dry cloth, they dove in like kids.

We had great fun and all watched, fascinated, as the colours moved and blended in each other's pieces, sometimes beyond our intentions or control.
So my friends haven't seen their dry masterpieces yet. I look forward to watching their eyes light up when I deliver their pieces to them at our guild meeting next week.

 
Independent as ever, Scott's piece has a purpose in a future piece! Lovely exploration of orange. Might there be a pumpkin in his future?
 
 
 Wendy has obviously spent time with a lot of sunsets. She's responsible for the Tofino Project.

 
 Pat played with how the colour migrated and changed. Some lovely landscape potential too.

 
 Mary Anne was determined to have a turquoise sea. She wasn't sure at the time but I think she'll be happy with her results.

 
And last, my demo piece. The centre was splashed with the pearl opaque. Hmmmmmmm.

Sunday 5 October 2014

Gallery at Le Beausoleil B&B, October 2014

Things need to be adjusted and rearranged as materials move in and out.
I think my sister does a great job.

Visit their site at     www.lebeausoleilbandb.com