Thursday 30 June 2016

IPM - Day 26


(SHHHHhhhhhhhhhhhhhhh.................... I think it's done...........
There is still the framing to be decided and then the applique leaves to be applied..............................

But I think I can rest now.)

Wednesday 29 June 2016

IPM - Day 25

LOTS of little things today.

I started out by addressing the road and the turf on either side. I know I wanted tall grass in the sunny areas and I knew I had to "rough up" the path edges.


Stitching grass ('till the cows come home, haha) wasn't going to give me the effect I wanted because there would be too many stitches breaking up the flow of the tall grass.
I decided to cut thread in about one inch lengths and lay them in place as grass. A light netting and a few passes of "stitched" grass held them securely. This allowed me to place the colour where I wanted it rather than have the variegated thread dictate where it would be. Each blade of grass is full length without being chopped up with stitch breaks. A softer look I think.
I used 4 different shades of variegated thread for this, the lighter ones in the sun and a darker one for the deep shade at the bottom.
The edge of the path was restitched in different colours. It's closer to what I want, but I may revisit it again.
Just that lower right corner to deal with now.


I filled out the bottom left with leaves and stems bringing the vegetation right up to the road.

I mentioned before I've been changing the shape of this piece each time I put the photos through Photoshop. And I'll show you why.


Here is the un-cropped work.
I have already decide to chop about 4 inches off the bottom. It's just too heavy otherwise.  But now I'm looking at lowering the top edge as well........to here....


Still lots of time to make that decision.

Tuesday 28 June 2016

IPM - Day 24

I thought I'd work on something different today.
Lower right side, rather large and so far empty except for a large tree trunk.

It's not uncommon to find small shrubs growing close to the base of large trees. So that's what I did.
After cutting some THIN pieces in a darker green than I have been using, I paired them with a small length of yarn and made a clump! of ?????

dumped in the middle of the path....lol

Looks like a rather large installation.....until you see the whole. Sigh!


It needs more ... but I switched to making more maple leaves.............12 more for a total of 17


And I still have half a FQ left.


Monday 27 June 2016

IPM - Day 23 - Hours of Detail

We're down to this type of work now. It doesn't always photograph well but these 3 sections came up rather well.

The first is a young tree, right of centre. It's natural that there should be a lot of new growth in this gap in the canopy. The only real issue here is continually adjusting the leaf size, in keeping with the prospective and depth of field. The leaves are big enough here I could place them singly and stitch. In some ways it's faster but more frustrating. I ended up using a tiny piece of netting and restricting the application to no more that a few inches. That way I could cut the netting away cleanly and then move on to adding more leaves.


The second is the detail on the road. The edges are finished to the edge on[y. There needs to be additional overhang of grasses etc. That's a final job. 


The left of centre, the region of the drop off, is in shadow. It still needs to be filled with vegetation but of a different nature, weedy and lush. This will need several layers of colour to fill it out. so it's about half done.

Some times it's nice to step back and see how far this has progressed. About 2 weeks ago it looked like this!

Now it's beginning to look right.


Trend-Tex Challenge 2016 Winners

The fabrics this year were a challenge. Here are the winners and a gallery of all the entries. There are some really imaginative used of the fabrics!
Below is the link.

http://www.canadianquilter.com/photo-gallery/trend-tex-quilters-challenge.php

Sunday 26 June 2016

IPM - Day 22 - Making Distortion Work for You

After I spent a few hours making more little bits, I needed a change of pace.

A few years ago I made some pieces with loosely tacked maple leaves from a plaid material. I deliberately allowed them to distort and the result was a leaf with texture and movement. I wanted the same thing again for my large framing leaves.


Using my painted cloth I drew an outline. After stitching the veins, I overcast the edges and THEN cut it out. This was all done without hooping or stretching the material taut in anyway.


This resulted in leaves that can't lie flat. Each is distorted somewhere.


Using the real twigs as a guide, I pinned them to the background.


When it's time, I'll anchor them with a few stitches down the main vein only. I need at least a dozen more. So I'll probably just make a few everyday until the FQ is gone.


Saturday 25 June 2016

IPM - Day 21

Sometimes you just have to trust yourself.
It's pretty risk free when your work is made off the canvas and stitched on. If you don't like the effect you can toss it. Today I held my breath and jumped in!

The road...
This was holding me back. It had to be finished before the surround areas, because the foliage is intended to lean over it as it does on an abandoned path.

This had to be done on the canvas. But with all the bits and pieces in the makeup of the road to date, cloth, wool roving, netting, it would be next to impossible to change my mind or rip anything out.

I started by slitting the netting and inserting some snips of fabric and organza. I needed highlights, places where the sun comes through the canopy.


Over that I placed another layer of pale beige gauze to imply a brighter intensity of light on the path. Then I held my breath and started stitching, first with beige and browns.


I didn't want ruts, I just wanted an irregular surface. This also served to anchor the gauze and the cut netting with the bits underneath.
Finally I went for green.


The edges were done first again, to anchor that gauze. It's looks rather rigid at the moment but that will change with the addition of overhanging larger vegetation. The grass was a bit of trial and error to get the right colour as it moved from very exposed to shade.

And finally back to the big picture......
It's coming along.

Friday 24 June 2016

IPM - Day 20

I had to take a break from this piece.
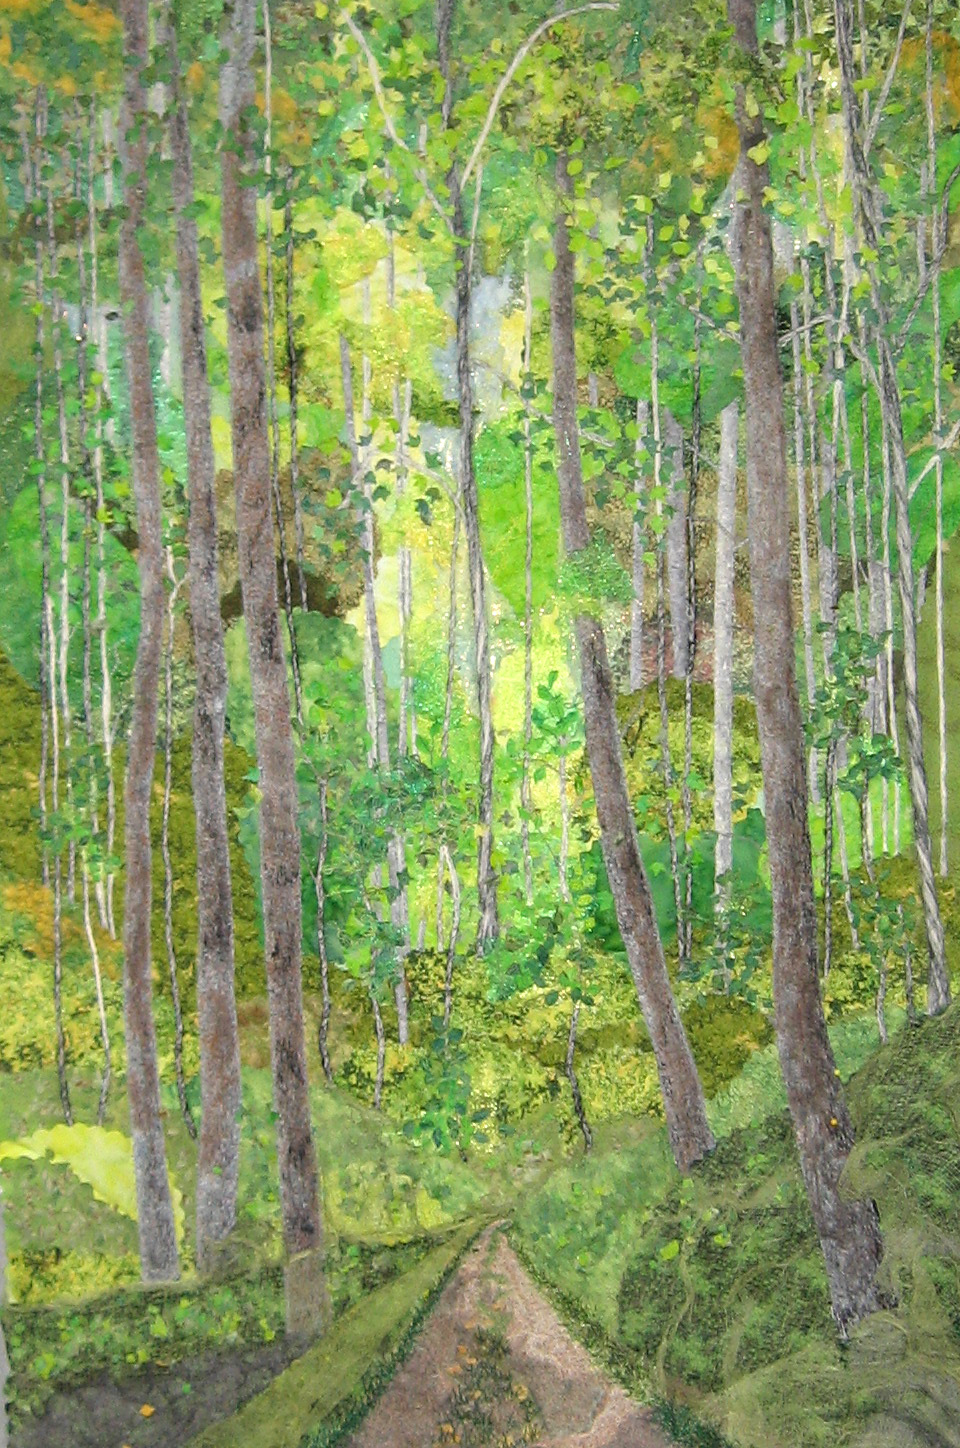
As I moved forward, the detail changed from being suggested to being very important. I was running out of steam. I spent most of my waking hours when I wasn't stitching, musing on upcoming issues. When I walked I looked at the light behind the leaves to get a sense of the proportion of light to dark leaves.
I took several trips to our local arboretum to look at how the branching habit changes with the prolonged exposure. How many young trees survive to reach 4 to 5 ft tall, tall enough that I needed to consider them in my design.

One thing I've learned from my several forays to the CQA shows is every square inch needs to be filled, either with stitching or material. When I look back at some of my work I realized I was doing that, but in tiny bits. Now I'm trying to do it evenly across the whole scene.

So after a break at the cottage ( and a few days to recover from that! ) I finally got my head back to where it needs to be, hopefully refreshed and ready to make ART.

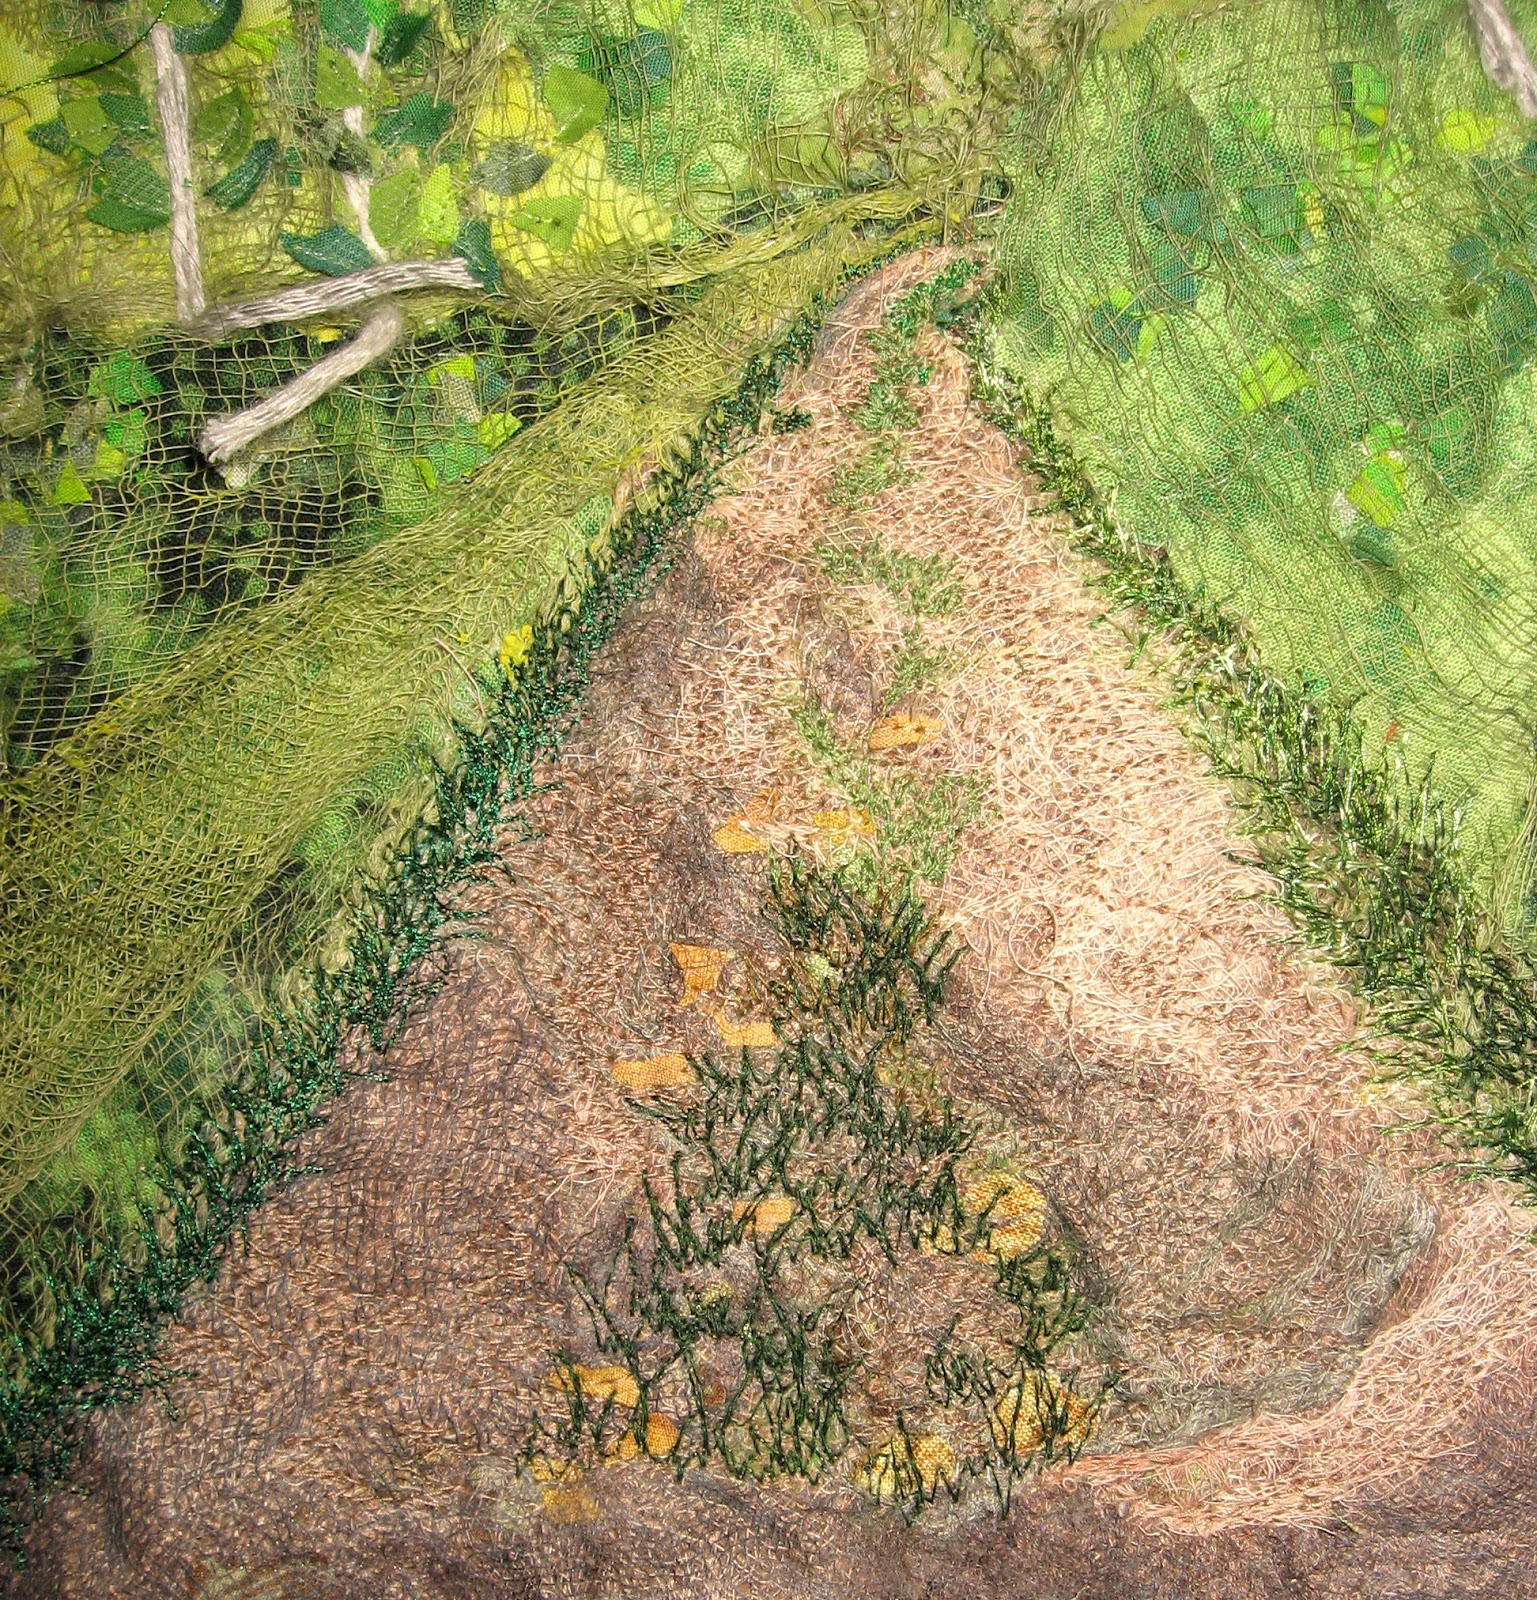
I didn't really want to do a lot of the leaf detail with netting. Yes, it works but it does, to a small degree, reduce the luster and colour intensity of the material. Parts of this woodlot scene are in bright light and the netting was making it dull. I spent a few hours cutting out all the netting I could.
I wanted a different approach. This morning I thought I'd try the washaway stabilizer again, as a sandwich for all the minute.


I added some small bits of the green and yellow organza along with the small leaves. The stitching with variegated thread was just enough to hold each piece in place. After it was washed away, dried and ironed I placed it into position (trial and error here) with mono filament so there would be minimal over lap of thread to keep things bright and clear.


 I'm satisfied and delighted with the look. It took about an hour to assemble a patch about 4 inches square but a minute to attach it. Ha!

The other thorny issue that was pushing itself forward was how to finish this piece. I have made a large number of big pieces with self bindings and they look nice, but I wanted to go back to using a frame as a background. I spent a few hours this past week auditioning material from my stash, and this morning I found it!
Last month I was taken to a "new" (for me) store with OMG, great prices. I had brought home this Northcott Stonehedge fabric in a pattern I had never purchased before, and I love the affect.
( Those leaves are the ones I used a while ago, dried and pressed. TO BE REPLACED!)


So I think I'm back in the groove again. ( That's good......I'll be less crabby and eat less!)

If you live in my area, Kitchener/Waterloo, here's the link to this woman's store. Very much worth a visit!

carolinequilts.blogspot.ca

carolinequilts.blogspot.ca

Saturday 18 June 2016

CQA Show Link

Here's a link to the 2016 show in Toronto!
 Enjoy!

http://www.canadianquilter.com/photo-gallery/national-jury-show.php?year=2016

IPM - Day 19

I didn't have much time today as I'm off for a few days to Georgian Bay to celebrate Father's Day with Ed's daughter. I get to do nothing........(yeah sometimes that's an issue.....so I always bring some hand work!.)
I had a long but fun day at the 2016 CQA Show in Toronto, yesterday. Lots of inspiration and lots of fun with my friends.

This morning I decided to add something to my IPM piece I've been putting off. I added the final layer of painted gauze to the foreground. I'm glad I did. It brings that part into line with the feel of the rest of the piece. It doesn't grab my eye anymore, and it no longer weights down the scene.


The harsh colours are softened and some contour is defined. It's no longer a slab of material.

Thursday 16 June 2016

Correcting the Wow in a Heavily Stitched Work

I have been fortunate with this piece ( IPM ) in that there has not been too much distortion. I didn't use a heavy canvas this time because I wanted to see how difficult it would be to comply with Quilt Show rules that insist the stitching be visible on the back. For commercial work I really don't care that I cover the work but for a juried show it can make the difference in a tie!

The nature of this piece had me stitching lightly at first over all area, tacking down pieces and added small elements here and there. It wasn't until I added the heavy felted trees that I started noticing some issues with the edges. The more I stitched them the more pronounce it became.

Some of it disappeared as I added the thin trees on both sides. The right side was almost gone but it was still pronounced on the left.

The reason for it is simple. The repeated lines of stitch vertically along the edge were drawing it in. Every time you change weight of thread or restitch an area this increases the density of the stitching. It affects how the set tension of the machine lays those stitches.

Here is a "cheap and dirty" solution....and another reason to over size your work. An inch or two all around is all that's necessary.


I ran a series of stitches up and down over a concentrated area in the region where the wowing was showing. This drew in the offending spot and now the edge lays flat. Before I trim the piece to its final shape I'll run a few more lines the whole length. These will be hidden under which every finish I decide on.

IPM - Day 18

Well I too have had enough of the teeny tiny. What is on now is going to have to do.
I need to take a break and decide whether I need one size larger before I over lay the branches. I'll probably go ahead and cut out the final leaves.
But with that in mind, I also need to decide how I'm going to finish the border, ie. adding a narrow or thick one, self binding or extending the interior out into he border.
Hmmmm.
And there is also the path!  ( and the shrubbery! )


I noticed as I photoshoped each day I was changing the shape of the piece. to the point where I'm cutting away most of the path. I don't know yet whether I want to reduce the size or that because its unfinished I want to remove it from the photo.


I included the raw photo today so you can see how much I am chopping.

Wednesday 15 June 2016

IPM - Day 17

I spent the better part of this morning vacuum packing my nephew's wedding quilt and getting it parceled and off to the post office. Tick one more thing off my calendar.

Then I played with tiny things.
I decided to try and cut leaves that evoke the maple leaf. It worked out pretty well,..... but I'm barely started.
These leaves were the next size up so I started with pieces of fabric about 1 cm sq. Small enough I had to hold them with tweezers.


I had purchased a set of tweezers a while back and found them a nuisance for everyday use because they lock. Not a good trait when you're just moving and placing things. But for this perfect.

I could hold the small piece of material and trim it into shape. I cut a strip of fabric with one side shaped and cut the points into the other.


And placed on the trees.


Looks good.
Now another hundred or so......!

Tuesday 14 June 2016

IPM - Day 16

This should be the last of the trees.
After I stitched down the 16 small trees in the background I added 2 mid sized, one centred and another to the far right. I'm thinking that's enough....but any thing could change.

What's next?
Leaves, tons of tiny ones, both for the small trees in the background and mid size for the mid ground.
I can do them at the same time as they'll be applied under netting.
Lucky me!

So starting at the top again, a few hundred snippets were dropped wherever they fell. I use batiks if I can when the pieces are so small so it doesn't matter how they fall. Though it is all stitched down under the netting I cut away as much as I can, anything later than an inch to keep the colours bright.


Monday 13 June 2016

IPM - Day 15

Between yesterday and today I added detail to most of the upper 2/3 of this piece. Twitch muscles can only work for so long so I took lots of breaks. It was about 5 more hours over the two days.
And the type of work it was, really doesn't photograph well.
But this afternoon I played with....guess what? .........MORE TREES.

I'm ready to add some under-story material. These are pinned in place at the moment. They are achingly straight and most really won't go to the top of the piece. These are piece of cotton/wool/acrylic blend yarns. I made a quick trip to the store for these. What I had was a bit too fuzzy. For this, tall skinny stems. I wanted them very smooth.

To morrow, I'll stitch them down.................and make some crooked! LOL


Saturday 11 June 2016

IPM - Day 13

You'll have to look really closely to find what I spent at least four hours doing today.
All the background from the olive green up is stitched. That's almost half.
And I decided to finish all five
major trees. Each now has at least 5 passes with different thread and a light crayon treatment to heighten shadow areas.
Now the fun begins bringing this alive.
So it's decision time again.
I was going to machine stitch the series of shrubs at the centre with foliage style stitching. Now I'm considering doing them off the piece, on netting.
There are also about ten small trees to be placed/stitched but I'm undecided whether the foliage should be snippets, stitches or netted foliage.


Friday 10 June 2016

When I Don't have the Right Fabric....

I paint it.
If I'm going to feature some mature maple leaves I wanted an interesting fabric.
I'm not sure of the exact style yet but, in case I wanted some loose edges I needed to make sure both the front and back of the fabric had colour.

I had dyed some lime green fabric last September. Lime green is not the colour I wanted so I over painted it with a medium "stale" green paint from last year to which I added some black. After dousing the FQ with about 1/4C of this paint I crumpled it up and left it do do its magic.

Turning to the lower edge of the piece, I needed another shade of cheesecloth to alter the sameness of the green fabric on the close slopes. Using one of the pale brown cloths, again from last summer, I folded it loosely into a container and poured the remaining green paint, diluted, complete with black clumps and added some yellow, also diluted. A minute of mixing and this was left to drip dry in the sun.
Voila! My fabric needs are fulfilled.


And on the landscape....


Glorious Poppy

Who can work in a basement studio when this opened in the garden this morning?


IPM - Day 11

Finishing the background will take up to two more days. It's not something I can just push through. It's a bit mind numbing. So while I take breaks from that I need to look forward to the finish.

So here's my inspiration.
On my walk this morning I brought home a small branch.


I broke it up into smaller pieces. I wasn't sure whether to make the leaves full size but these maple leaves are not gigantic....and they work.
Whether to have them lying over the border? and the binding is another question for later. Here's the cropped photo.


Though the finish on the bottom will lighten the dark green, the leaves add some balance.
I will finish the bottom before I star assembling the leaves. OOOOOO I may have to paint some fabric!!

Thursday 9 June 2016

IPM - Day 10

One quarter of the background is complete........except for the left hand tree. I haven't tackled it yet so it provides a good example of the before and after. The smaller trees, while anchored under netting have no stitching. I decided they're too small so they're finished with crayon and seta pens.

Stitching or filling the background is being done with species in mind. Each different fabric is, in my mind, representing a different type of tree so whether or not it really makes a difference in the overall piece........... I know it's different.