Saturday 31 January 2015

Here I Am In LIMBO Again

Between projects I drive my husband nuts. (That's also when I usually send out inappropriate emails to my family. Good thing they know me!)

I do have something simmering at the back of my mind that came out of the blue, yesterday, when I was surfing. It's not gelled yet so you'll have to wait.

In the meantime, I came across a notice that Ricky Tims is coming to Mt Forest in May. That's just over the watershed from here.
I'm not going, I don't go to most of these things as I usually have nothing in common with those celebrities who are there to sell their quilt patterns.

HOWEVER I thought I'd have a look at what all the fuss was over his Convergence Quilts. There are lots on Google. They can be spectacular. I looked a few and figured it out but I was left wondering about the amount of fabric that went into this particular quilt.

So this morning I decided to play with........4 charm squares.
I figured at the least I could donate it to the Guild's Mini stash needed for the show in May.
BUT 4 five inch charm squares yielded a patch less than 7 inches across.
That's a lot of waste.
Now I know the quilts use bigger cuts and I still used quarter inch seams in this mini. I'll have to hunt down one of his books to satisfy my curiosity about yardage for a full sized quilt.

So here's my mini, a al Ricky Tims, for the Guild. LOL (I may still embellish it!?)


ps. the narrowest lines are .25 inches wide. Fun!


Thursday 29 January 2015

Kicking Horse Final - unbound

Well I think this is finished!
Included is the original photo taken by my husband in 2011. I took the liberty of making it a bit grander and added more colour to what was a rather dark aspect.
Enjoy!


And I decided to name it "Heather's Morning Walk" or "where is that dog!"  LOL


Wednesday 28 January 2015

Tuesday 27 January 2015

Kicking Horse - Day 7

Yesterday this piece became a whole different ball game.
It was mounted on canvas and.... I decided the base was wrong and swapped it out for a lighter texture.
I tried to lighten the darker base with paint and crayon but I quickly realized it would be easier the other way. Nothing was stitched down so it was an easy swap.


This colour is more in keeping with the dying vegetation on the ground. And to tweak it a bit more I cover the whole thing with my dyed gauze.


Today I finished the section encompassing the photo transfer.


The section where the trees cross over has had a first pass with ink and thread, the left side with a shrub willow and the bottom with more leaves and grass.

And I took the plunge and finished the trunks on the evergreens and placed both Poplar trees.


OMG I'm almost done?
 Maybe another 2 days. Lost of fiddly stuff yet and lots of leaves to add.

Sunday 25 January 2015

Kicking Horse - Day 5

This is where it starts to get exciting for me. The background is fleshed out and I can move into the foreground.
I added some of the major trunks today. I'm concentrating on the left side this morning. The trunks all need to be over stitched and finished but I also need to add more crown as well.
I don't feel like working on the evergreens today so I'm putting in shrubbery (LOL)
There are still some big decision to be made as to how I'll finish the right side.
What's in the original photo? More trees of course.
Soon I need to mount and anchor this piece. But I don't want to do all the fiddly stuff on the stiffer cloth.


Saturday 24 January 2015

And More Trees

Guess what I've been working on!
Trees.
(I did take a day off and we took a day trip to....wait for it....Buffalo NY.. Why?
The Blue Monk Restaurant. Yum.)

This is excruciatingly slow work and I have now taken to adding the deciduous leaves individually. It really isn't much slower. The pieces are bigger now and can be handled separately. But I need to take more frequent breaks (That usually translates into snacking Sigh!)

I took the large trunks off for a while. They became a nuisance factor. They aren't needed yet.


A few hours later......


Wednesday 21 January 2015

Kicking Horse - More Trees

Noon:
I now have all of yesterday's evergreens in place and added another layer of netted deciduous leaves.
All the major tree trunks are still only pinned in place. They are close enough to the bottom and front that there is still a call for foliage behind them. It's also time to brighten the colour of the deciduous foliage. More evergreen foliage is needed but that can wait until I feel like micro work again.


I'm getting to the point where I need to start thinking about that large poplar/birch right behind the figure. The exact specie is not an issue as both are found at that size and in that location. I'm leaning towards poplar as a birch that size would probably have more distorted and dirty bark at its base. I need to play with paint now to match the colour to the picture. As this is early autumn ( Sept ), there will still be a lot of foliage on it. Branch placement should fill the rest of the center sky.
This piece is not batted or on canvas yet but I'm getting close to where it needs to happen. That extra texture will show in the foreground.
I do like how this is coming together :-).

4:00 PM
I have worked on trees most of this afternoon. Can you spot the differences? LOL Slow work.

Tuesday 20 January 2015

Returning To Kicking Horse

I think it will be a while before I start another piece that involves these micro quilted trees.
They are great, but they take a toll on my eyes and my twitch muscles. I need to take frequent breaks when I do them . How many to date for this project? at least 20, with 8 today. They don't look very substantial but the cumulative result is very natural and full.


I'm feeling my way through this one. I have cut and placed ( pinned) a lot of fabric for tree trunks but remove and add foliage to give the look of depth.


I do jump around when I work on these things. When I get tired of one section, I leave it and move to another area. I changed colour to a lighter green. The evergreen foliage is younger and closer.

Monday 19 January 2015

BlownAway 3 - Final

Well this is finished..almost.
The only thing left is to add the pearl paint.......
and I can't find it. Sigh!
I cleaned up and "put it away in a safe place" before Christmas and it's still in it's safe place.

I have until March to find it. It will be one of those nagging annoying things that I'll spot out of the corner of my eye........ one day......... until then....

But as I was sewing the binding I had an idea.........BEADING!........?
Time will tell.
In the mean time I can return to other things.

Sunday 18 January 2015

Blownaway 2

Well I went down for the count with a nasty cold but after 4 days of utter boredom I started back on this challenge piece. I had done a bit before today. This is now mounted on a high loft poly batting to give some dimension to the unstitched portions. I finished up the snowshoes and added the snow at the base.
And started stitching.
There will not be much, in fact what is applied as of now is almost all that will be added. The rest of the stitching will be snow. It and the hair will receive the same final treatment of shiny snowflake white.
But I have yet to decide whether and when to apply pearl paint. Gotta think on that one for a while.
In the mean time I guess I'll have another nap!

Monday 12 January 2015

Somewhere Near Kicking Horse Mountain

Whenever I make and sell a large piece, it takes me a while before I can revisit it. But it's not until I decide to go there again that I remember the work, the effort, the loss of sleep and the time that I devoted to that one piece. You'd think it would be easier, but no. So I let it slide to the back of my mind and the bottom of the list.
However, I received an awesome kick in the pants this morning to get back there.

My brother in law, forwarded me a photo from one of their guests who had purchased my last Takkakaw Falls effort and couldn't wait to show how wonderful it looked in their home. (It does!)That's a plus for me, as I don't usually hear from people who own my work.

 
So I put aside the challenge piece and returned to BC.

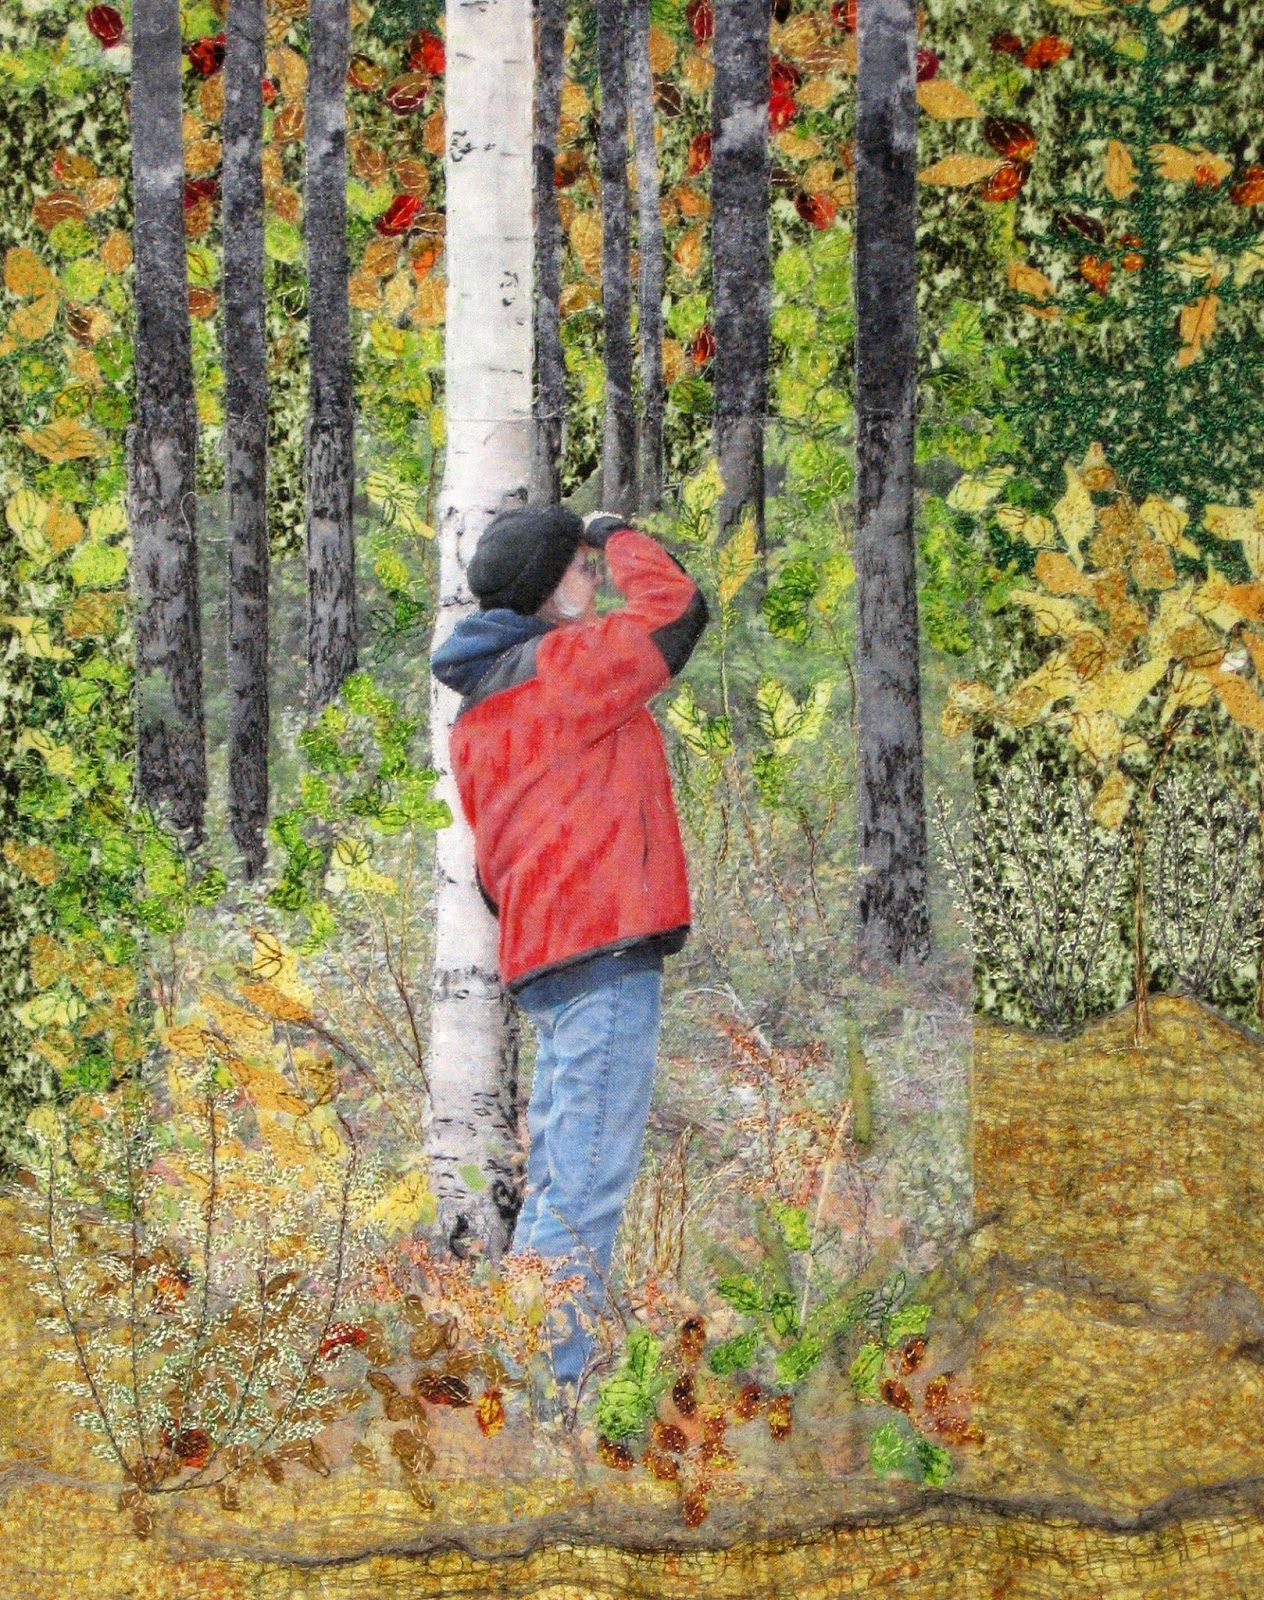
My husband and I visited in Sept 2011 and most of my vistas that I reproduce are from his photos; Takkakaw Fall and this next one of my sister.

 
Who can remember what she was looking at but the shot of colour in the early autumn woods still thrills me with it's jolt of pure red. Now I love this picture but it doesn't do justice to the trees. I can fix that! As I had never done a photo transfer before I though this was a good subject.

Pure colour with the edges disappearing into trees and small shrubs. I can do that!

A friend made the transfer for me almost a year ago, and I've sat on it waiting till I had the confidence? and impulse to tackle this one. And as usual a hundred decisions had to be made before I started.

I scoured thru all the photos looking for similar landscape, but do think I could find another with a birch? But knowing their growth habit, the birch does not grow like a conifer. But it will be close to the last tree that goes onto this piece, so I can sleep (haha) on that.


The one thing I had decided was while the evergreens were going to be primarily net based thread work, the small shrubs and deciduous stuff were going to be snippets, under netting.

All the possibilities come out and on to the table.

There is a lot of green vegetation here, so, to make my life easier I started with 2 fillers plus sky over most of the background. At this point the photo transfer is added to get the best position for her action.
Then I started adding TREES.
 
Some are "behind" all the greenery and were anchored immediately. Some are truncated because their bases "disappear" behind the deciduous trees and shrubs.
And some are large and rise out of the photograph. Colour is pretty good but a little thread or crayon or paint at the end will blend them.


The photo is an 8x11 so the background is close to a metre in height.
The trees look like trees and the figure emphasizes their height.


Along the way I started adding some autumn leaves. They're underneath the bigger trees and for the most part are just colour, no detail.


The background trees need to fill in and almost completely obscure the sky. The netted foliage is dark, almost black. And there's lots more to come.


Saturday 10 January 2015

Challenge #2 - Blown Away -CQA - Lethbridge

Well I hadn't planned on starting this today. I actually went down to my studio this morning with other plans. But this cartoon was staring me in the face and I wanted to see if my idea was feasible.

This challenge is a little more forgiving? in that there are 5 fabrics instead of 2. I think I've figured out how to make them work for me.
There are two categories with this challenge. The first is the use of the 5 fabric plus whatever others you want and the  other is the harder? task of using only the 5. That's the one I'm going for.

As the theme is "Blown Away" (I understand the winds in Lethbridge Alta. are fearsome and unrelenting), this is what I've chosen to attempt.


After literally days of searching and changing my mind several times, I found online, this copyright free image used in a children's book, from the 1900's about the NorthWind. After enlarging it I copied it onto newsprint, just big enough to fill the fat quarter.


Cutting it out with an eye to the original is a slow and delicate process.

 
But when I transfer the cartoon pieces to my chosen background it works pretty well.

 
Once I had the pieces cut, the transfer to the web and fabric went quickly. All 5 fabrics are there. The hair, beard and mittens are the same fabric. The hair is just reversed to make it lighter, as is the face, the red, reversed.
All that's left to do now is the thread painting. (Don't you just love the cavalier manner I say that!) LOL ( I have until May.......probably finish it next week)

Friday 9 January 2015

Nightscapes Challenge Final

After I took all the pins off and started sewing the pieces on I moved a few things.
The major change was I moved one of the flowers more to the left. Now there is a linear group of 3. But the main reason was the wings of the moth were not showing well on the brilliant yellow. Moving a flower out from beneath the moth shows her better on the green and purple. She is totally floating, only anchored to the flower behind and the leaves underneath. Cool.

Minimal stitching and judicious glue........ I don't thing anything will fall off or move. LOL

Now I have to put it away ........ 'till May, our guild show.
AND
I can move on!


Close up from the left side showing the dimensionality

Thursday 8 January 2015

Nightscapes and Escapades

All the pieces are made.
This is the first placement trial.
Feathers were used for antennas and a thin ribbon is the tongue of the moth. I may remove it.


This finishes out at 20 x21 inches.
I'm glad I bought the companion purple fabric.

Tuesday 6 January 2015

3D Moth

Well I changed my mind..again re making this gal 3D. The first push was the density of the structure. By the time I had finished thread painting, trimming and folding the excess to the underside and then covering the raw bottom, it was easy to shape the body and the wings. The second push came from the flower structure. They were very puffy and petal like. I tried ironing them to remove that but the fact that I had added a layer of organza plus two pieces of the required yellow cloth resulted in a seam line that wouldn't lie flat.

Way back when I started this I'd had the idea to wet felt a body for this moth and then add wings. I had thrown that Idea out BUT I had made the body. I took this felted cylinder and wrapped it with gauze to give me something with defined edges that would take stitches.

I sewed this cylinder to the underside of the moth structure, tapering it toward the rear and adding tighter passes of thread, indenting the abdomen to imply segments.

Now this moth sits off the surface and is in keeping with the dynamic flowers. (Still not time for the antennae.)


Sunday 4 January 2015

Thread Painting the Hawk Moth

I considered a number of ways to present this moth and as the project got bigger and bigger in my head, I laughed and decided to simply thread paint.
I took a few hours this morning though, and quilted the backing. There was really no other logical way of doing this already very busy back ground other than tracing the "tiles". This satisfied the elusive question of showing your work on the back. Now I won't have to fussy quilt around leaves and flowers.


To paint the moth I started with a small piece of a brown/purple batik cut just big enough for the moth. To hoop it I needed to add borders for the hoop to grab. After tracing the outlines of the moth onto the tear away stabilizer, I transferred the outline to the cloth. Then the piece went into the hoop.

 
I started with the with a light beige/brown.

 
 Though the pictures appear to show a lot of black, I chose a dark brown. I can always add bits of black later.

 
Then bars of white to finish the wings. Now I need to spend some time picking the right pink/magenta/purple.
One hour later I decided to blend all three!

 
The hold up now is how to finish the abdomen, whether to leave some of the material unstitched. 
 
January 5 - Well this morning I decided to "paint" the whole thing. So here she? is.
I gave the brown areas a few passes with an even darker brown and the white crown and the strips on the body had a few passes with a sparkle white. I cut away the excess batting and trimmed, folded and glued the batik backing along the edges. That way I don't have to stitch the moth down all around.
 
 
The antennae and the tongue will be added when I place this on the flowers.


Saturday 3 January 2015

Challenge # 1 - Nightscapes

I'm finally ready to start this one.

When this was first introduced at a guild meeting in September, I laughed at the fabric choices. I guessed they didn't sell well so the manufacturer was happy to offer the materials as a challenge. Left over Halloween?  Owls and moon Yellow?


Not very inspiring. So I walked out and didn't bite.

However, at a later meeting, I was chatting with a PP. regarding the poor response to the challenge fabrics. She coaxed and I bought!
The material sat in its wrapping for at least another month, while I thought and explored the theme.

I got thinking about what happens at night. Lots of unseen things like the evening primrose (that yellow is almost the right colour). Night blooming flowers are visited by moths. An idea was born.

The evening primrose and the Hawk moth.. a dance in the dark!


Don't you just LOVE the internet!  So I began to see this might be fun.

But first I had to do something about that awful owl fabric. I knew I only had to include a small portion in the picture but I decided I wanted to feature the colour in a big way. I found on line and ordered one of the companion fabrics. (The rest were really very lovely, but the owls????)

 
Using a method I hadn't done for a long time I married the two fabrics into a woven composite. The owl is less obvious but the eyes are there........ watching all the drama of the night!


(It's not just me.. my camera does not like this purple. Even with photo shop I doubt it will look the same twice.)


So that's where I am to date. I'm still laying out the design to marry the insect and the flower. I think this will end up being 3 dimensional, definitely a mixed medium effort.