Tuesday 28 February 2017

Moonlight - Growing Pains

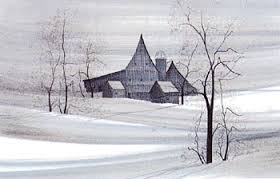
Thought I work on the barns every day, I've limited myself to one bobbin a session. It's that labour intensive and I found if I try to do much more I get sloppy. Not much point in posting a inch of progress. When it's time I post it again, probably when its finished.

So I turned back to the Moonlight piece. I went ahead, a few days ago, and quilted this to the batting.
I did want to add some trees but I decided I wanted a little more character, so I turned to my corkscrew hazel as a roll model.

There were several false starts. As this in only pinned on I could easily change it.

Finally on the way.


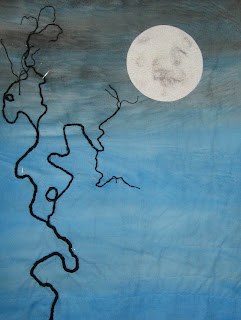
Not quite finished. Tomorrow I hope.

Saturday 25 February 2017

One of those Eureka Moments

I spent quite a while last evening talking to hubby ( well out loud anyway...such a patient soul. )
Though I was happy with how the material was eventually utilized, the finish was still a question.
We started talking "storm" as suggested by the sky. A series of straight diagonal lines was his idea; I leaned towards curves in sympathy with the assumed curves of the roof.  Though I know there were black windows in the original picture he suggested a solitary light..........in a barn? Milking the cows at dawn?
Monkey minds, both of us!

This morning, I received an email from my son in law. My daughter is participating in the current Toronto Artist Project. Both are wonderful artists, she, with acrylics and oil and he, as a wood turner. We are always exchanging pics we think might inspire us.

The message was about Tracey Lawson. She is in The Artist Project this year. She has had work shown in several Canadian events and venues and magazine features. She's offering for sale the piece I saw 3 yrs ago. For me, it was a heart stopper and a game changer.
When I saw that piece again I knew it was the perfect way, the only way to finish my piece.
Thread Painting
Even then it took me an hour before I could begin. This is a big piece.


The right hand section beside the barn took 2 hrs.
This will take a little while! (I wish I hadn't sewn on the barns)


Friday 24 February 2017

Barn Raising.....in the Studio

Early this morning, after dithering for a VERY long time, I picked up my rotary cutter and slashed my B&W cloth.
And then put it all back together.
When I was satisfied I'd arranged it to the best of it's limitations, I anchored most of it with a glue stick, massaged the barn into place... and stitched it down.


I gave the eaves some depth by couching on several strands of black yarn. The buildings need a little more definition, but that's not urgent.

Cutting and cropping this has reduced the metre cloth about 2/5th. Now it goes on the batting and the sky/ground definition begins.
Tomorrow.

Thursday 23 February 2017

Barns

I decided to give the moon a rest while I decided on the quilting.

Today's "fun" is the barn.


I think what attracted me to this is the fluid nature of both the snow and the lines of the barn. Very few straight edges. I can't help but think OLD when I look at this.

After drawing it out to the size I want, I cut it out and auditioned in on the raw fabric.


Now I'm thinking I will have to abandon this fabric for this piece. There are too many distracting lines. These were caused by the permanent wrinkles in the plastic sheet I put over my work table.. I won't throw the cloth out as there will be a use for it, but I either have to repaint this background or change the background all together.

Sigh!
More decisions.

2:30 PM - NEVER GIVE UP! NEVER SURRENDER!  ( from my favourite movie EVER!)

I went back and flipped the background fabric, then cut out the barn cartoon from the intended fabric.
THIS I can work with!


I love the implied roofs!
Sigh!

Wednesday 22 February 2017

Answering Questions

I've had a couple of inquiries re HOW I painted this last piece.
As always, I use the Pebeo Seta Colour Transparent paint ( Fr.)
I use a very wet slurry and the the moment I'm finished I sprinkle ordinary table salt and hang the piece sideways to dry.
Sounds straight forward.
The salt moves the pigments in the paint and the gravity determines the direction. If this piece lay flat it would develop a totally different pattern.


Winter Moon

As usual, the closer I get to starting something new, the poorer my sleep is. I spend the waking hours going over technique, fibres and finishes......ad nauseum.

Today I dove into the the simplest of the three, the most straightforward.


My only question with this one last evening, was the composition of the moon. I wanted something other than the Pearlized white cotton. I considered doing another patchwork, similar to what I assembled last year ........


but I thought it might appear a little too busy, seeing as this moon is at least 4x the size of the other. And I had no more silver. I tried an abstract approach, but discarded it quickly.


In a lot of "fibre art" moonscapes the craters and irregularities are features, either painted in or highlighted with quilting. In the back of my mind I was still admiring the results of the Poseidon's Eye I had used in the seascape. To give some crater qualities to plan white cloth I added some roving I purchased a short time ago, rabbit fur/lambs wool blends. It was actually white! Used with some of the darker greys and then anchored under organza, it stitched beautifully.


One of the issues with organza is it can, and in this case did pull. But the surface of the moon was up for a little irregularity.
Adding this to the night fabric called for applique, but with a piece this large I prefered to use reverse applique. There was a lot of material at the edge of the moon, cloth, organza and batting and I didn't think it would lie smoothly in a perfect circle. With the reverse applique the edge is fixed before sewing.

I like to cut my "hole" a 1/4 inch smaller than required. Using a full size circle for a guide the further the edge is cut about every 1/2 inch and with gentle pressure the edge can be ironed into that perfect circle.


Normally I would glue and then invert the two pieces and stitch along the inside fold, but the moon material was still too bulky, so I blind stitched the two pieces together.

Tuesday 21 February 2017

New Projects Need New Painted Cloth

The last few weeks have been frustrating.
I've had several projects whirling about in my mind. The hold up was finding the right materials. Nothing in my stash seemed to be right and I was changing the project to suit the materials I DID have.

In the end it didn't work.
I knew I needed to paint or dye, but the prospect of that, indoors, in winter was not attractive. It's messy and the drying time is much longer.

But after a rest and a change of scenery this last weekend, I decided TODAY I would paint.

This first piece looks deceptively simple but its all in the material.
In order to create something like this....


I painted this.

This picture is actually stained glass.


To get the same lightness but earthy feeling I'm going to start with this cloth. This one will require one more wash of paint to make it less sky and more water!


A wash of orange and touch of brown....... Much better.


And as classic as this picture is....

it requires a very dramatic background.


And of course I always need fresh yellow!


As of this moment I haven't decided which one I'm going to start with!
Stay tuned!

New Quiet Time Handwork

Ever since all the "jane" blocks went together and were mounted on the frame, I've had no quiet work, work I could travel with or sit out in the summer yard to work on.

So this weekend I started on a pattern I purchased last June.


I had been assembling the material for this over the year. I've chosen some FQ and with my last purchase of shirts from the thrift shop I' think I'm all set.


This involves embroidery both on separate material AND on the adjacent blocks. I thought it was unusual and charming. There is a whole series of these available.

So on my Family Day weekend jaunt to the Thornbury cottage, ( the ice IS out) I started the fist of sixteen "Pre" panels. These will all be joined to make a continuous loop of embroidery around the quilt . I'm rather excited about this one.


Friday 17 February 2017

Sandpiper On The Beach - Final


Who would have thought it would take so long to find the perfect spot for these two. At least 6 tries, 6 photos, 6 trips up the stairs to the computer, (not to forget the pestering of the resident photographer),  but its done.


One of the hold ups was, I wanted a different finish for the sky. The pattern didn't really suggest clouds, so I turned to the internet and found this pattern, Poseidon's Eye, another of Leah Day's work.
Always a great site for inspiration.

I'm leaning towards self binding this. I really don't like picking one binding fabric when there are so many dominants.

Thursday 16 February 2017

If you're going to TART it Up......

Go all the way.  😀

Once the starfish was beaded, I looked for other places to add beads.
The surf was a logically place to start.

I strung a long run of mixed white, silver gold and clear beads and then tucked then in and around the cheesecloth and organza bits.
All of the colour bands were given a serpentine/wave treatment in a few logical colours.
Wave lines were added in the sand. "Cloud" will be traced into the sky.
Not much left to do but the "stars" of our show.


Wednesday 15 February 2017

Tuesday 14 February 2017

Adding Interest

The complete background is very common so it needs a focal point.
What else do you put on an ocean beach  ..... A Sandpiper (sp)


After scouting a number of photo sites I chose this one. Nice clear design and minimal mottled feathers. I've moved away from using embroidery thread to harder and larger quilting thread. It goes faster and the thread is much less expensive.

First the cartoon is drawn and coloured on a piece of stablizer. This was a stiff piece so I didn't need a hoop.
Then add colour.


I was undecided about the order and went back and forth a few times.
The white was last.

Here he is on the beach. The legs are just yarn for now. I won't add the legs until I stitch this guy on.
The hold up is the foam. It needs a better finish.


Monday 13 February 2017

Tired of This Long Winter

Tomorrow may be Valentine's but unless the sun shines it will just be another dreary cold day.
My son came over and shoveled the last heavy snowfall last night. That was a welcome early gift!
But after listening to the wind howl as I went to sleep I wanted some warmth for these tired achy bones so this morning I decided to go Tropical.
This is nothing new in technique and was actually inspired by my daughter's art work.


In fact I used some of the material I had assembled for her wedding quilt in Tropical colours.


Just a simple strip construction. The only trick here is staying level.
The sand was one of my fabric scores from Saturday.


I do feel a little warmer,....... but I'll still turn on the fire.