It was time to bind the edge of my Forest Violet piece.
When the design and/or the quilting go right out to the edge and beyond I have the option of 3 bindings.
1 - French fold, commonly used on quilts.
2 - Envelope binding, can be used anywhere
3 - Wrapped Binding
And I just found this one on line.
It takes the facing PAST the edge so there is no chance of the facing showing from the front,
similar to what I use.
4 - http://www.terryaskeartquilts.com/Studio/tips-tutorials-and-more/my-new-favorite-quilt-facing-technique/
I do use all four and have come to prefer the wrapped binding for large art pieces.
There is often a lot of material at all the edges, particularly with raw applique. The addition of a French bindings adds at least another four layers of material. And if it's finished by machine rather than hand sewing there can be up to 10+ layers of material. Some domestic machines can't handle that but even using the walking foot you can run into trouble in the form of thread breakage and skipped or uneven stitches.
The Envelope binding always presents that 'where will I turn the piece' issue and the subsequent finishing and stitching of the open edge. If the resultant seam is very thick it can be tricky to get things to lie flat. It's sometime hard to prevent the backing material from showing along the edges. I've tried to make that work for me, but unless you chose your backing material carefully it can look messy. The only way to tighten the edge appearance is to anchor the backing with a row of stitching around the whole perimeter of the piece. That totally negates its choice if you were trying to avoid thick layers as you now have double the thickness of the art piece plus the backing to stitch through.
It works great for lighter and thinner pieces or where the edges of the pieces are relatively clean of other fabrics ie the 'feature' is centered.
So for this one I wrapped the edges. It can be sewn in place with one circuit of the piece, trimmed and turned precisely. The only drawback is it needs hand finishing. I included the hanging sleeve in the construction.

I start by drawing, with marker a continuous line 1/4 inch outside the intended stitching line.
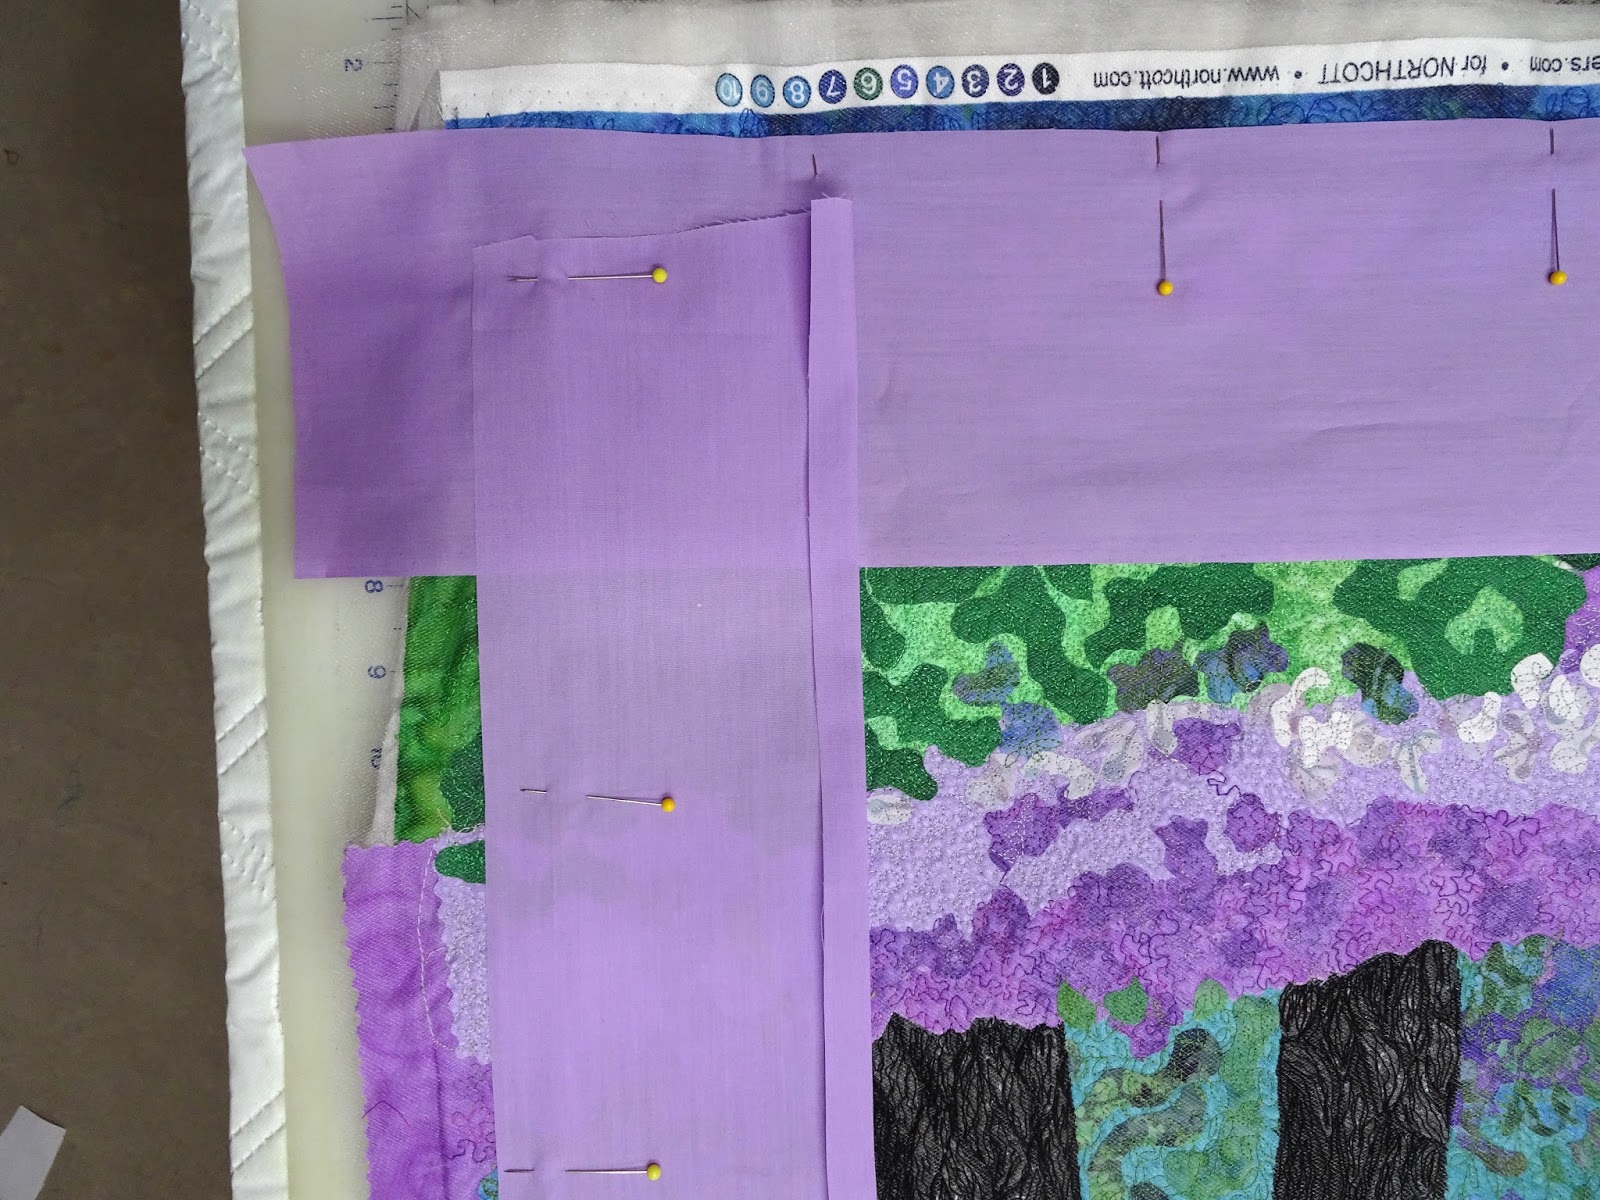
Four pieces of material about 3 or 4 inches wide are pinned in place on the marked line.
Two edges, I chose top and bottom, are wider and travel out over the edge. The other two sides stop just short of the drawn line.

I stitch 1/4 inch from the edge of the binding material using three stitches at each corner to ease the sharpness from the corner.

The corner is trimmed a little past straight.


When it is wrapped and stitched it can be tightened so the binding only visible from the edge. This results in a clean, straight edge. With a good pressing I don't need to stitch around the whole circumference to keep the binding from showing.

Show Ready!
When the design and/or the quilting go right out to the edge and beyond I have the option of 3 bindings.
1 - French fold, commonly used on quilts.
2 - Envelope binding, can be used anywhere
3 - Wrapped Binding
And I just found this one on line.
It takes the facing PAST the edge so there is no chance of the facing showing from the front,
similar to what I use.
4 - http://www.terryaskeartquilts.com/Studio/tips-tutorials-and-more/my-new-favorite-quilt-facing-technique/
I do use all four and have come to prefer the wrapped binding for large art pieces.
There is often a lot of material at all the edges, particularly with raw applique. The addition of a French bindings adds at least another four layers of material. And if it's finished by machine rather than hand sewing there can be up to 10+ layers of material. Some domestic machines can't handle that but even using the walking foot you can run into trouble in the form of thread breakage and skipped or uneven stitches.
The Envelope binding always presents that 'where will I turn the piece' issue and the subsequent finishing and stitching of the open edge. If the resultant seam is very thick it can be tricky to get things to lie flat. It's sometime hard to prevent the backing material from showing along the edges. I've tried to make that work for me, but unless you chose your backing material carefully it can look messy. The only way to tighten the edge appearance is to anchor the backing with a row of stitching around the whole perimeter of the piece. That totally negates its choice if you were trying to avoid thick layers as you now have double the thickness of the art piece plus the backing to stitch through.
It works great for lighter and thinner pieces or where the edges of the pieces are relatively clean of other fabrics ie the 'feature' is centered.
So for this one I wrapped the edges. It can be sewn in place with one circuit of the piece, trimmed and turned precisely. The only drawback is it needs hand finishing. I included the hanging sleeve in the construction.

I start by drawing, with marker a continuous line 1/4 inch outside the intended stitching line.
Four pieces of material about 3 or 4 inches wide are pinned in place on the marked line.
Two edges, I chose top and bottom, are wider and travel out over the edge. The other two sides stop just short of the drawn line.
I stitch 1/4 inch from the edge of the binding material using three stitches at each corner to ease the sharpness from the corner.

The corner is trimmed a little past straight.


When it is wrapped and stitched it can be tightened so the binding only visible from the edge. This results in a clean, straight edge. With a good pressing I don't need to stitch around the whole circumference to keep the binding from showing.

Show Ready!
No comments:
Post a Comment