Thursday 31 July 2014

Building the Salmon

I spent a few hours on the internet yesterday, looking at photos of salmon. Again there are many species so I suppose mine will end up being a hybrid of the Sockeye, the brightest. They also appear to look the most ferocious. This was a lovely water colour but then, there are hundreds of photos.


I gave my fabrics a trial with a few shades of organza. That was a no brainer as it would provide the shimmer I wanted on the fish. Red was best over my orange fabric. Black over the orange worked for the belly fins and the tail.


After making a drawing, a copy and a reverse copy on the fusible web, I cut out the body and then carefully added the organza a tacked it all around to the fusible coating.


For the upper fins I used a pale grey. The head is the only portion without organza but that will be gussied up with thread. And I may change the organza colour on the tail......too dark.


So this guy is about 18 inches. I'm rather please with my fabric efforts.
(PS I just went out and ordered a bolt of white fabric and 4 litres of the primaries. My husband is such an enabler. It was he who pointed me to the product.)

Tuesday 29 July 2014

Painting Cloth with a Project in Mind

What project. Sockeye Salmon in the Frazer River.

I just nicely got started here when my wandering step son and his wife arrived. They are flying out tomorrow to Switzerland but we hadn't expected them to arrive just as I wet the cloth. But I got three done.


I had started mixing yellow into the orange I mixed last week heading towards what I hoped would be Salmon. I've only got the primaries here and it takes drop by drop to not make mud.
These are indoor shots and they're still wet.

But okay, its got promise.


I started this beauty by laying the dry cloth over the wet left behind. the mottled orange. It dried when I went to greet the kids and when I came back I applied a very dilute mix of the remaining orange and blue. A muddy pea green.      Sure looks like fish to me!


This last is a very wet emulsion of red. taking it out to pale. The touch of orange at the top was from ( shame shame) the unwashed brush!   Nice.

I could really go through a lot of cloth. I cut what I had left of the 5 yards I bought into rough fat quarters.

Gotta go do the hostess thing. Good thing I made a BIG peach cobbler, bean salad and cleaned the house (as well as weeded the drive) this morning. Now I can visit.

We'll continue on with these. I need to study some photos of fish bellies (I'm not a fisherman) and see where I can take these pieces.
But tomorrow is the trip to the Airport so I guess that day will be lost. (At least to this project.)

Monday 28 July 2014

Grizzly - Final - sold

Trimmed about 2 inches from the top and added only a simple dark grey border.
Wonder how the fishing is going?

Sunday 27 July 2014

Grizzly Bear - Day 8 - Complete

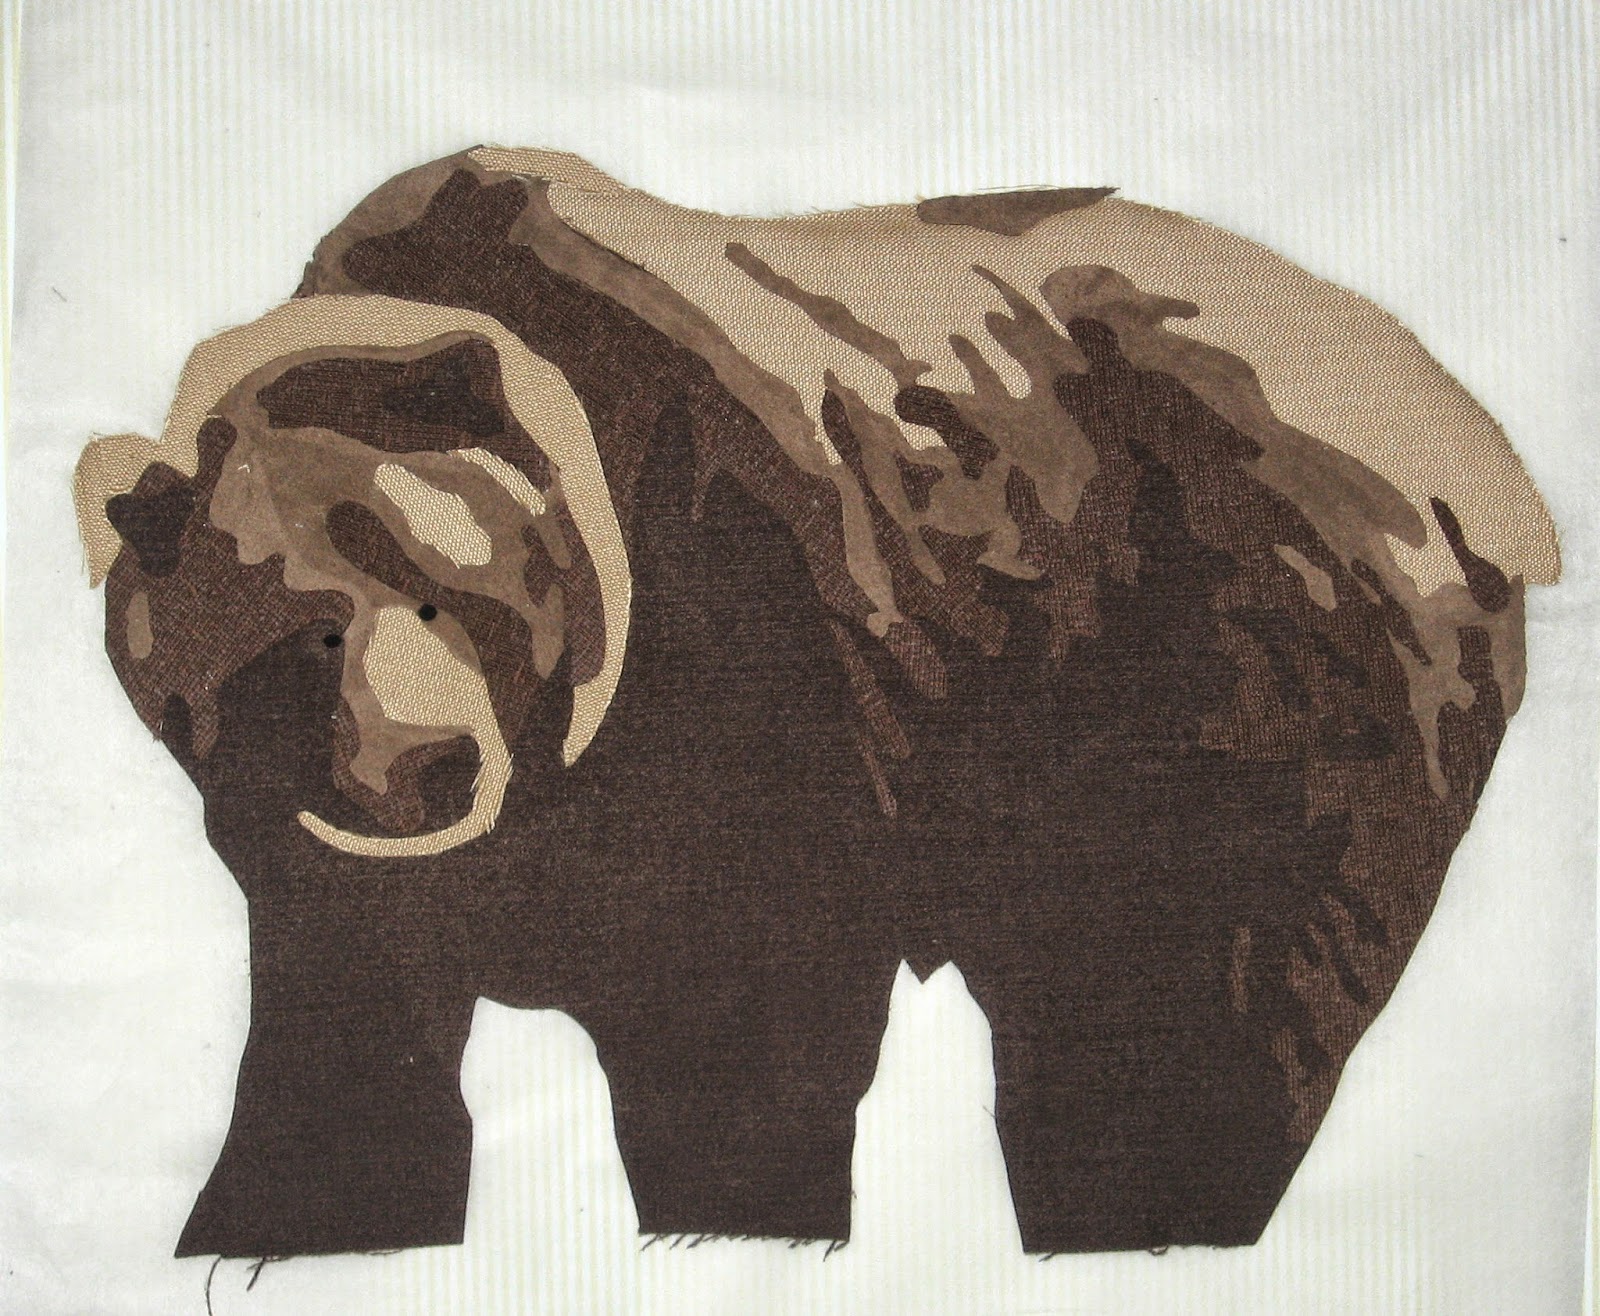
When I had applied the background, I had decided NOT to run the strips across fully, but rather break them at the border of the bear. I thought I would reduce bulk and save fabric.

 
Consequently, I needed to pad the bear a bit. In retrospect my cutting the strips did not really save me any fabric and in fact was the reason I had difficulty keeping the lines straight.

So I tacked him down with invisible thread and moved on.
I used a technique I saw at the CQA show that I referenced in an earlier post, stitching some detail off the piece on hooped netting.

 
I made several different widths in the gold and a bit in brown in order to better feature the top edges of the bear's coat.


After it was applied with the same colours thread, I feathered inward with a few other colours to blend the applique and hide the extra netting. When I over stitched it I tacked it loosely onto the background and irregular intervals, so it didn't look like a clowns ruff. I was pleased with the results as it gave the coat edge more dimension.

Last, I went over his underbelly and lower legs with black. In addition to adding more shadow I lightly defined the individual legs. This bear is not Thread Painted, he is Thread Sketched.

He also needs to be lightly pressed yet to remove the horizontal folds that occurred when I rolled the canvas to get it into my machine, This is the reason I ship the finished pieces rolled outward with newsprint. The creases end up on the backing and not the image.

 
Added some water sloshing at his ankles and he was complete.
I will finish this with a narrow binding, probably the dark grey water batik.
Then he's off tomorrow, home, to the Columbia Basin and my gallery in Golden BC.


Friday 25 July 2014

Grizzly Bear - Day 7

I started today by taking out the last 2 inches of work. I had been going to finish it with SKY, but I thought it was just too close to the stream. My colours of blue are limited.
Instead I went with low green hills as a break, more in keeping with parts of the Columbia Basin ( shhhh I know there are mountains but I'm not looking in that direction today.)

I could go a couple of inches higher with the sky. I still have a couple of intense blues. But I'll decide that tomorrow. I'm tired and its time to quit.


Tomorrow The grizzly will be padded and tacked down, and I can start on the edges of his coat!

Thursday 24 July 2014

Grizzly Bear - Day 6

I would not have thought birthing this fellow would have taken this long. I have to stop and correct the slope and the colour progression as I go. If it were bands of continuous colour, I don't think it would have been as big an issue. But with the size of the floppy cut out I found it was easier to stitch from either side. But it did invite more necessary adjustment.

So here he is, on the shores of the Columbia River flats. One more day should complete his habitat.

Play time 2 - Reworking my Painted Cloth

Had to wait for a sunny and mild day (with no visitors) to get back to my cloth.
While I liked it, I recognized the colours were not intense enough for my use. I seldom need pastel. Not a bad error though because you can't make it lighter once its been heat set, only darker.

I had one piece I had tried out some basic colour mixing on I hadn't photographed before as it wasn't anything other than a rag. I started with it and rumpled it into a ball, immersed it in very weak green paint to saturate all the white areas, and then left it to dry, as a ball, in the sun. After about an hour I turned it over and pour some left over weak blue.

 
It ended up looking like this. Now that's a usable piece of blue/green.
 

The piece I liked the best, I over painted with only blue and green, and then spattered some yellow. After a short while in the sun I heavily salted it. So it went from nice, to NICE!


from this


to this

And the last piece that was just a piece to try out some techniques also went up in value. Again still two distinct sections, but much more interesting. 
 
from this
 
 
to this.
I really really really REALLY like the salt effect.


Wednesday 23 July 2014

Grizzly Bear - Day 5

This delay has been very frustrating for me. Much as I love company and visiting and doing the Tourist thing, the bear has been at the back of my mind all this time.
But here are my step son and his lovely wife at NIAGARA FALLS. He's a born and bred Ontarian boy so this was nothing new but his wife is Swiss and had heard about the falls all her life.  That was kind of exciting to take her there.


But the BEAR..................  Actually going to the falls helped me decide between grasslands or water.
Water won.

I decided on a rather impressionist approach, not my own invention but a method I had seen several times before. Thin strips of fabric to suggest colour and depth. (And then I went to the store to add to my stash!).
And as my bear is standing in water I had to anchor his feet as I proceeded. And of course he casts a shadow.

 
The area between his legs was assembled separately, and after his feet were anchored it was a bit of a todo to keep him out of the way as I worked on the background.

 
Finally after I moved a few inches above his wet ankles it was again an easy job. About every 3 inches I stop, and lay an metre stick across to keep both sides even.
This is a good place from me to stop for the evening as I decide whether to put a sandbar in the river with my friend.

Sunday 20 July 2014

Grizzly Bear - Day 4

The process of filling in something this big takes a lot of stages and a lot of thread.
I didn't post yesterdays work because, frankly it looks awful at the beginning. Thread colours seem wrong and incomplete. It's not until you have gone over the work and achieved a certain mix and density of colour that it begins to look right.

This piece is still not finished. I can't complete the edges the way I want until it is attached to the background and THAT is still a 64thousand dollar question ( who remembers that show).

 
I started with the face.

 
The placement of the nose was critical so I drew and used a transparent tearway stabilizer


His nose is in the right place and the fur around the eyes and nose is lying is the correct direction.
The colours are still rather one dimensional yet.


 The amount of quilting is built up as each additional colour is applied. This view makes it very apparent that something this size is thread sketched as opposed to thread painted. Unlike smaller pieces, lots of the original fabric is seen.


 So here we are at the end of this part. The edges of the different fabrics are beginning to blend.


I added one more photo of an overexposed close up. The stitching is hard to photograph with my little camera but this photo gives you some idea of the colour interplay between the fabric and the thread.


Saturday 19 July 2014

Play Time

Took some time to play with my Setscolour Transparent paint. I chose paint because I didn't want the hassle that comes with dye powders and their limited life span. And I chose the transparent Pebeo because I wanted to layer colour.

Its very interesting and I was quite pleased with my first efforts. These were done in two batches. Paint, dry and fix, then all over again. The only PROBLEM was the second time around yesterday, the sun didn't shine so I didn't get the sun prints over the first colour as I had hoped. Hi Ho!

But it has real possibilities.


Friday 18 July 2014

Grizzly Bear Day 2 - Finished Cartoon

So there his is, with all his pieces.
Assembling him is not an exact science. Though it may be nothing more than a jigsaw puzzle, material stretches or shrinks as you apply the fusing material and as you cut it. The outer edges were cut exact but a number of the inner edges were left a little loose particularly if I could tuck them under another piece.
I will be covering the whole with netting before I start to thread sketch. Upholstery material is 3 dimensional because of its weave and the edges will fray and move. The netting prevents the needle or the foot from catching and adding to this trait and minimizes the distortion of the edges.

But don't hold your breath here. I need to spend more time with the original photo, studying the fur. This bear has layers of fur and whorls. Who'd imaged bear had cow licks.
I also need to work out the background. Probably similar to the original photo, but it takes a few days of thinking and frankly, doing some thing else.

Thursday 17 July 2014

Grizzly Bear


This bear was just too lovely not to feature as itself. When I was last out west, at Kicking Horse Mt., there was a compound that was home to a Grizzly. He ended up there as he had been an 

 
older, problem bear and it was decide to give him about 10 acres on the side of the mountain to do his thing,  as well as feature him as an educational resource. The ski lift passed over his den. In the winter he was hidden, but in the summer you could see him patrolling his fence. Of course he broke out several times and finally made a successful disappearance. But I remember having my sister say we had to turn back on a hiking trail as there were fresh signs of bear. They take their bear safety very seriously.

So in this picture he is lovely. Lots of contrast make this a good choice to use. So Photoshop reduced him to 4 colours for me. ( and I did it by myself and needed no help hurrah!)


After he was blown up to about 2 ft. x 3 ft., ( I use a projector) the outlines are traced for the four colours. This is then traced a second time onto a translucent reference sheet and then a third time in reverse on fusible web material.
They are numbered carefully from 1 to 4, then cut apart.


This bear is going to be built up, so not all the edges need to be carefully cut but forethought becomes very important. They are fused to the materials by colour.


 Where pieces will over lap they do not need to be carefully trimmed.
 
The base piece is the easiest. It is fused to a backing. When the reference sheet is laid over the placement of the next colours becomes visible.


The order of the pieces becomes a test of visual logic. What lies behind, and what is in front, Gradually the piece begins to shape up. That's it for day 1

Wednesday 16 July 2014

My little Tutorial for Photoshop CS6 on a PC

Start with your photo and crop it or enlarge it for ease.
Selection the Magnetic loop tool (3rd from top on the sidebar.)
Trace image and double click to disengage. Image should have the "ants" effect.
Choose Select on the top bar and click inverse. "ant" on the outline now.
Your image should appear on the right labeled background. It should have a lock image.
Double click the lock, select okay from the screen that appears, and then hit the backspace button. Your background should be gone.
Choose Select and inverse again to select the image. (I kept forgetting this one.)
Choose Image on the top bar and adjustments, then desaturate picture.
Choose Image again, adjustments then contrast. This you will have to play with to decide how much to adjust. It will depend on the original contrast etc.
Last, choose Filter, Artistic and cutout. The options then allow you to determine how many layers you want. You can take it down to 2 if you wish.

Hope this is useful to some.

Eureka! I Taught Myself Something in Photoshop!!

After 2 days  of strained relationships, I can now go from this photo


to this one..


And just to prove it wasn't a fluke, from this one


to this one


Stay tooned and after I've done it twenty more times I'll tell you how!!
This is a big thing for me. I don't learn as quickly as I used to and it was very frustrating to keep asking my husband .....or my son. They both gave me "that" look. HA!

Waiting for the Cinnamon buns in the oven I did this.. my younger son..


to this

 
ooooooooooooooooooooo I'm good

And after watching the finish of today's stage of the Tour de France, I present my older son.